One robot, many jobs
A mode variable remembers which job the robot is doing; buttons change it, and forever does that job.
A robot lawn mower has modes: mow, go home, pause. You press one button and it keeps doing that job until you choose another.
So far each program did one job. Real robots switch between jobs. The trick is a variable called mode that remembers which job is chosen. It holds a word, such as "follow", and mode = "follow" (the compare block in Logic, with a text in it) asks whether it is that word. Text must match exactly, so "Follow" would not match. The buttons only change the mode; forever looks at the mode every time round and does that job.
followLine is lesson 5's line follower, now in a function so forever stays easy to read.
- Predict: Read the code and say what it will do before you run anything. A wrong guess is fine: it shows you what to look for.
- Run: Run it and compare the result with your prediction.
- Investigate: Trace how each line of code connects to what you see.
- Modify: Change the code on purpose and check the result.
- Make: Build something new using what you have learned. Expect a few tries; that is normal.
Make your prediction first. Help opens once you've locked it in.
Predict
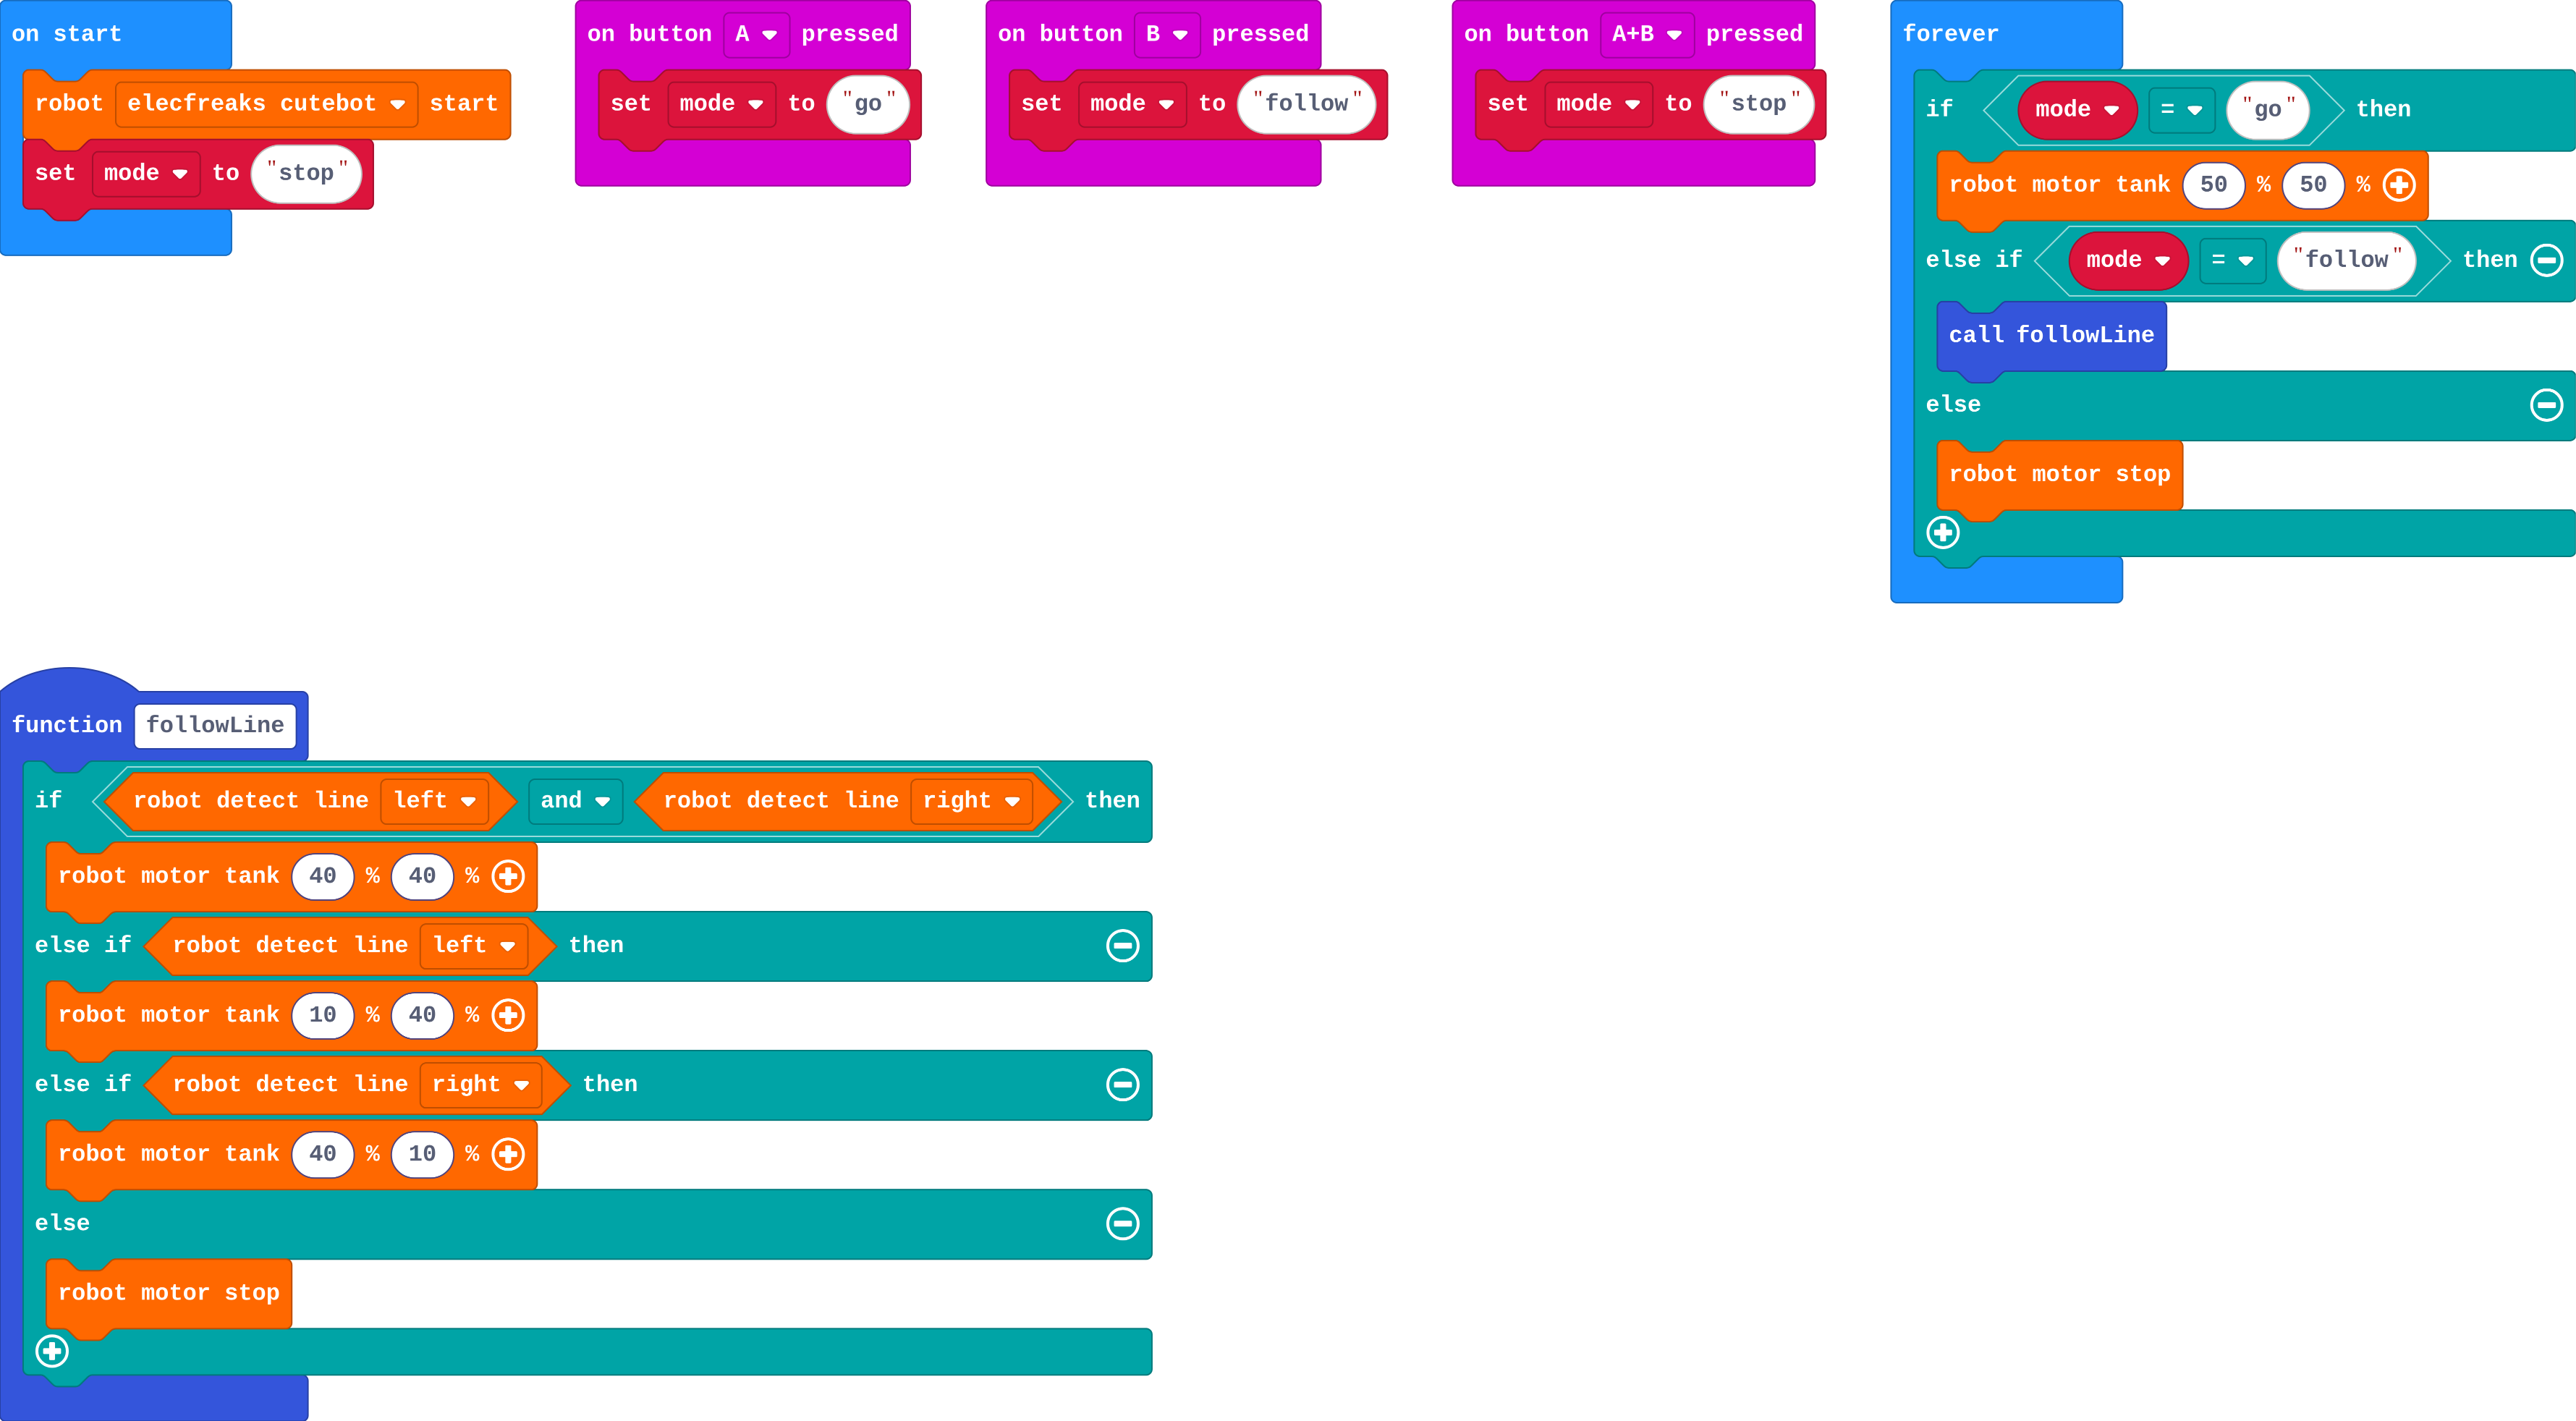
Show as code
function followLine () {
    if (robot.detectLine(RobotLineDetector.Left) && robot.detectLine(RobotLineDetector.Right)) {
        robot.motorTank(40, 40)
    } else if (robot.detectLine(RobotLineDetector.Left)) {
        robot.motorTank(10, 40)
    } else if (robot.detectLine(RobotLineDetector.Right)) {
        robot.motorTank(40, 10)
    } else {
        robot.motorStop()
    }
}
input.onButtonPressed(Button.A, function () {
    mode = "go"
})
input.onButtonPressed(Button.B, function () {
    mode = "follow"
})
input.onButtonPressed(Button.AB, function () {
    mode = "stop"
})
let mode = ""
robot.elecfreaksCuteBot.start()
mode = "stop"
basic.forever(function () {
    if (mode == "go") {
        robot.motorTank(50, 50)
    } else if (mode == "follow") {
        followLine()
    } else {
        robot.motorStop()
    }
})
Run
Drag the robot onto the line. Press B (follow), A (go straight) and A+B (stop) on the simulator's micro:bit, in any order.
Show as code
function followLine () {
    if (robot.detectLine(RobotLineDetector.Left) && robot.detectLine(RobotLineDetector.Right)) {
        robot.motorTank(40, 40)
    } else if (robot.detectLine(RobotLineDetector.Left)) {
        robot.motorTank(10, 40)
    } else if (robot.detectLine(RobotLineDetector.Right)) {
        robot.motorTank(40, 10)
    } else {
        robot.motorStop()
    }
}
input.onButtonPressed(Button.A, function () {
    mode = "go"
})
input.onButtonPressed(Button.B, function () {
    mode = "follow"
})
input.onButtonPressed(Button.AB, function () {
    mode = "stop"
})
let mode = ""
robot.elecfreaksCuteBot.start()
mode = "stop"
basic.forever(function () {
    if (mode == "go") {
        robot.motorTank(50, 50)
    } else if (mode == "follow") {
        followLine()
    } else {
        robot.motorStop()
    }
})
Investigate
Show as code
function followLine () {
    if (robot.detectLine(RobotLineDetector.Left) && robot.detectLine(RobotLineDetector.Right)) {
        robot.motorTank(40, 40)
    } else if (robot.detectLine(RobotLineDetector.Left)) {
        robot.motorTank(10, 40)
    } else if (robot.detectLine(RobotLineDetector.Right)) {
        robot.motorTank(40, 10)
    } else {
        robot.motorStop()
    }
}
input.onButtonPressed(Button.A, function () {
    mode = "go"
})
input.onButtonPressed(Button.B, function () {
    mode = "follow"
})
input.onButtonPressed(Button.AB, function () {
    mode = "stop"
})
let mode = ""
robot.elecfreaksCuteBot.start()
mode = "stop"
basic.forever(function () {
    if (mode == "go") {
        robot.motorTank(50, 50)
    } else if (mode == "follow") {
        followLine()
    } else {
        robot.motorStop()
    }
})
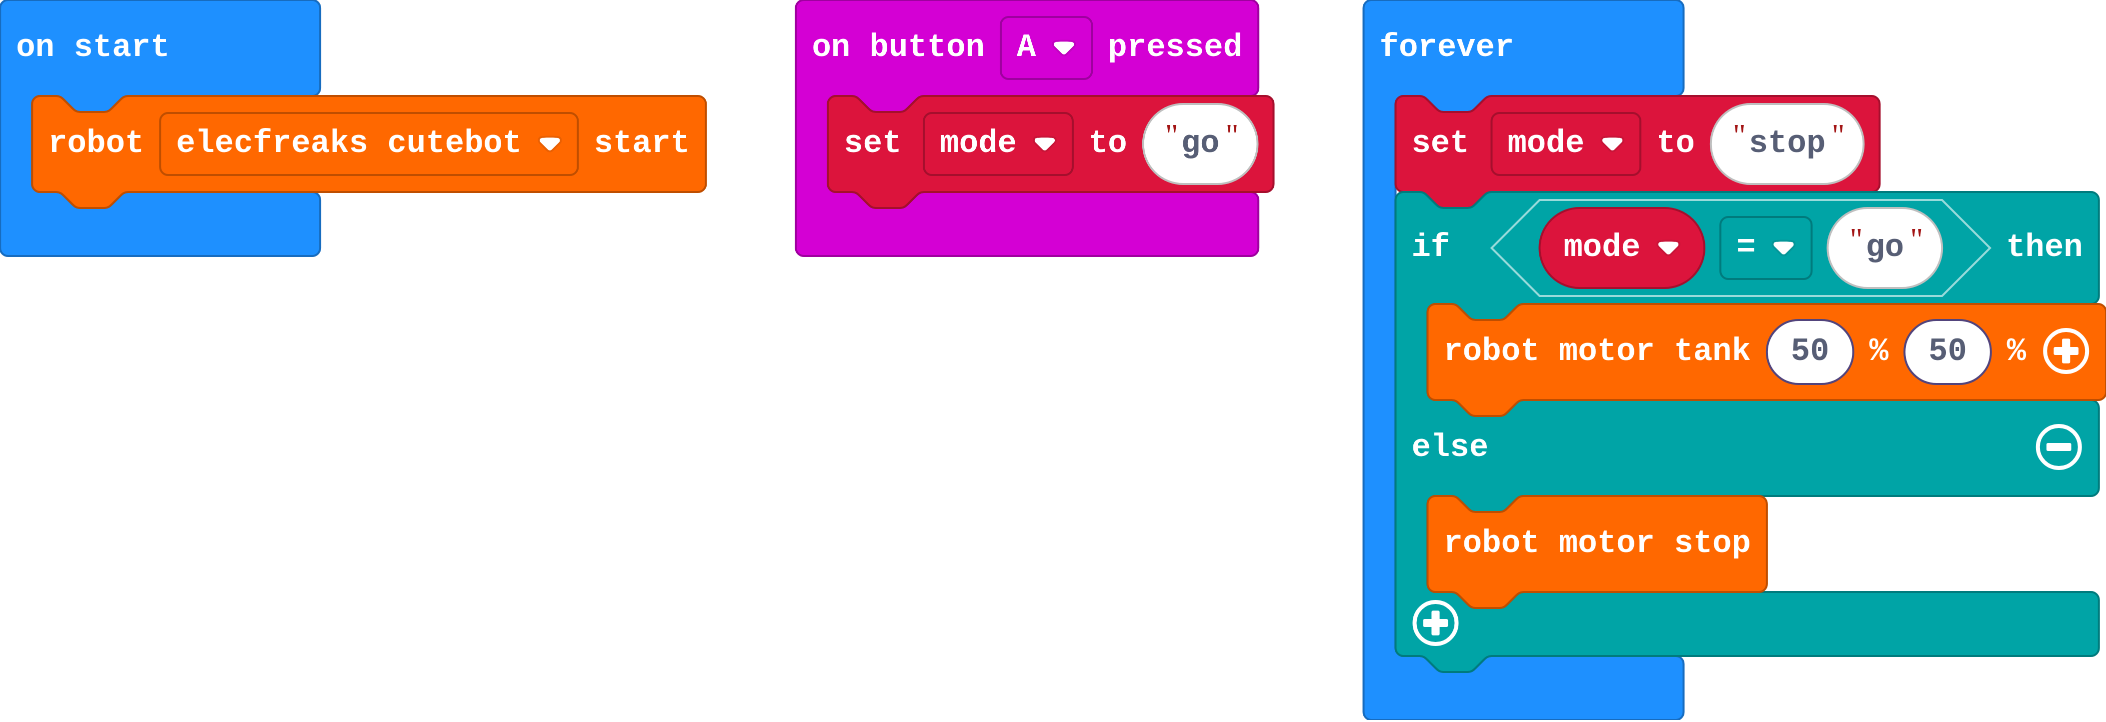
Think about what the button did, and what forever does next.
Ruby's program:
Show as code
input.onButtonPressed(Button.A, function () {
    mode = "go"
})
let mode = ""
robot.elecfreaksCuteBot.start()
basic.forever(function () {
    mode = "stop"
    if (mode == "go") {
        robot.motorTank(50, 50)
    } else {
        robot.motorStop()
    }
})
Modify
A person needs to know which job the robot is doing. Show a different picture on the micro:bit for each mode, when its button is pressed.
Need a hint?
In each button event, under set mode, add a picture.
Another hint
show arrow north for go, show icon diamond for follow, show icon square for stop.
Add a fourth job: explore, chosen by touching the logo. In explore mode the robot drives and turns away from boxes, like lesson 4.
Need a hint?
on logo pressed is in Input. Inside it: set mode to explore.
Another hint
In forever, click + on the if to add an else if: mode = explore. Inside it, put lesson 4's turn-away if … else.
Show a different picture for each mode when its button is pressed.
This ticks by itself when your blocks do what is asked.
Add an explore mode, chosen with the logo, that turns away from boxes.
This ticks by itself when your blocks do what is asked.
Make
Add a guard mode, like a security robot watching a doorway:
- shake the micro:bit to choose guard
- in guard mode the robot stays still
- when something comes closer than 20 cm, it shows red lights and beeps; otherwise its lights are off
Drag a box towards the robot to test it.
Need a hint?
on shake (Input) sets mode to guard. In forever, add an else if for guard.
Another hint
Inside guard: robot motor stop, then an if: distance < 20 → red lights and a tone (robot play tone); else lights off (black).
A guard mode, chosen by shaking: the robot stays still, and flashes red and beeps when something comes close.
This ticks by itself when your blocks do what is asked.
On a real robot
The same program runs on a real robot. Things to notice:
- A real robot moves as soon as you press a button, so put it on the floor first, or press A+B before you pick it up.
- Pressing A and B together needs both at once; real buttons make it easy to press one a moment early. That is a reason real robots often use one button to cycle through modes instead.
For teachers
Students use a mode variable to give one robot several jobs (go, follow, stop); buttons change the mode and forever does the job, then they add explore and guard modes. About 50 minutes.
Open the teacher guide: answers, solutions, slides and a worksheet.
Students will be able to
- I can use a variable to remember which job (mode) the robot is doing.
- I can change the mode with buttons, and make forever do the job for the current mode.
- I can add a new mode to a program.
Before class
This is the state pattern (in the curriculum, a variable that keeps track of what the program is doing). A variable called mode holds a word: "go", "follow" or "stop". The buttons only change the mode; forever checks the mode every time round and does that job. So a button press has a lasting effect, even though the button event itself is over in an instant.
The mode values are words (strings) so programs read clearly: if mode = "follow". In blocks, compare words with the = block from Logic and the text block from Text. followLine is lesson 5's program moved into a function, which keeps forever short.
Ruby's robot is the reset-in-loop slip from micro:bit Foundations (Counting): a starting value set inside forever wipes every change. The logo (micro:bit V2 only) appears in the simulator; on a V1 micro:bit, use shake instead. MOVE Motor classes can use the same pattern with Kitronik blocks.
Running the lesson
- Predict: the key question is why the robot keeps following after the button is let go.
- Run: drag the robot onto the line before pressing B.
- Investigate: act it out. One student holds a card with the mode word; another (forever) keeps reading it and acting. A third presses buttons by changing the card.
- Modify: a new mode needs three things: a name, something that sets it, and a branch in forever. Write the three on the board.
- Make: guard mode reuses lesson 3's distance question. robot play tone is in Robot.
- Real robot (optional): discuss why real devices often cycle modes with one button (lesson 7 and beyond).
The hard part (on purpose)
Buttons only change the mode; forever does the job. When a mode never runs, ask them to compare the word in the button with the word in forever.
When students get stuck
- Pressing a button does nothing. Ask: Is set mode inside forever as well as in the button? Fix: Set the starting mode once, in on start. Only buttons change it after that.
- The new mode never runs. Ask: Is the word in the button exactly the same as the word in forever? Fix: Spell it the same way in both places (explore, not Explore).
- Guard mode beeps all the time. Ask: Is anything within 20 cm? Is the tone inside the if? Fix: Move the box away; keep the tone inside the if.
Stretch and support
Stretch: Make one button cycle through the modes: A sets mode to the next one in a list (go, follow, explore, stop). Or count how many times guard mode was triggered.
Support: Give the guard branch's else if with its question; students add the stop, the distance if and the lights.
Where it leads
Next unit: Talk. The buttons move to a second micro:bit, which becomes a remote control. Real-world links: lawn-mower and vacuum modes, a lift's modes (going up, going down, doors open), traffic lights.
What each step is for
- Investigate: A button only changes the mode. forever reads the mode every time round and does that job, so the robot keeps doing it until the mode changes.
- Modify: Adding a job means a new mode name, something that sets it, and a branch in forever that does it.
- Use a variable to remember which job (mode) the robot is doing.
- Change the mode with buttons, and make forever do the job for the current mode.
- Add a new mode to a program.