Wait for a press
Make the micro:bit wait for a button press or a shake, then react.
A doorbell, a game controller, a TV remote: each one waits for a press, then does one job.
So far the micro:bit ran its blocks and carried on by itself. Most devices wait instead: nothing happens until you press something. A block that waits like this is called an event block. You find them in Input.
In the simulator, click the A and B buttons with the mouse. To shake, click SHAKE above the micro:bit.
- Predict: Read the code and say what it will do before you run anything. A wrong guess is fine: it shows you what to look for.
- Run: Run it and compare the result with your prediction.
- Investigate: Trace how each line of code connects to what you see.
- Modify: Change the code on purpose and check the result.
- Make: Build something new using what you have learned. Expect a few tries; that is normal.
Make your prediction first. Help opens once you've locked it in.
Predict

Show as code
basic.showIcon(IconNames.Asleep)
input.onButtonPressed(Button.A, function () {
basic.showIcon(IconNames.Happy)
})
input.onButtonPressed(Button.B, function () {
basic.showIcon(IconNames.Sad)
})
There are three groups of blocks here. Which ones run straight away, and which ones wait?
Run
Press A, then B, then A again. Compare with your prediction.
Show as code
basic.showIcon(IconNames.Asleep)
input.onButtonPressed(Button.A, function () {
basic.showIcon(IconNames.Happy)
})
input.onButtonPressed(Button.B, function () {
basic.showIcon(IconNames.Sad)
})
Investigate
This program has four groups of blocks. Try it in your head first.
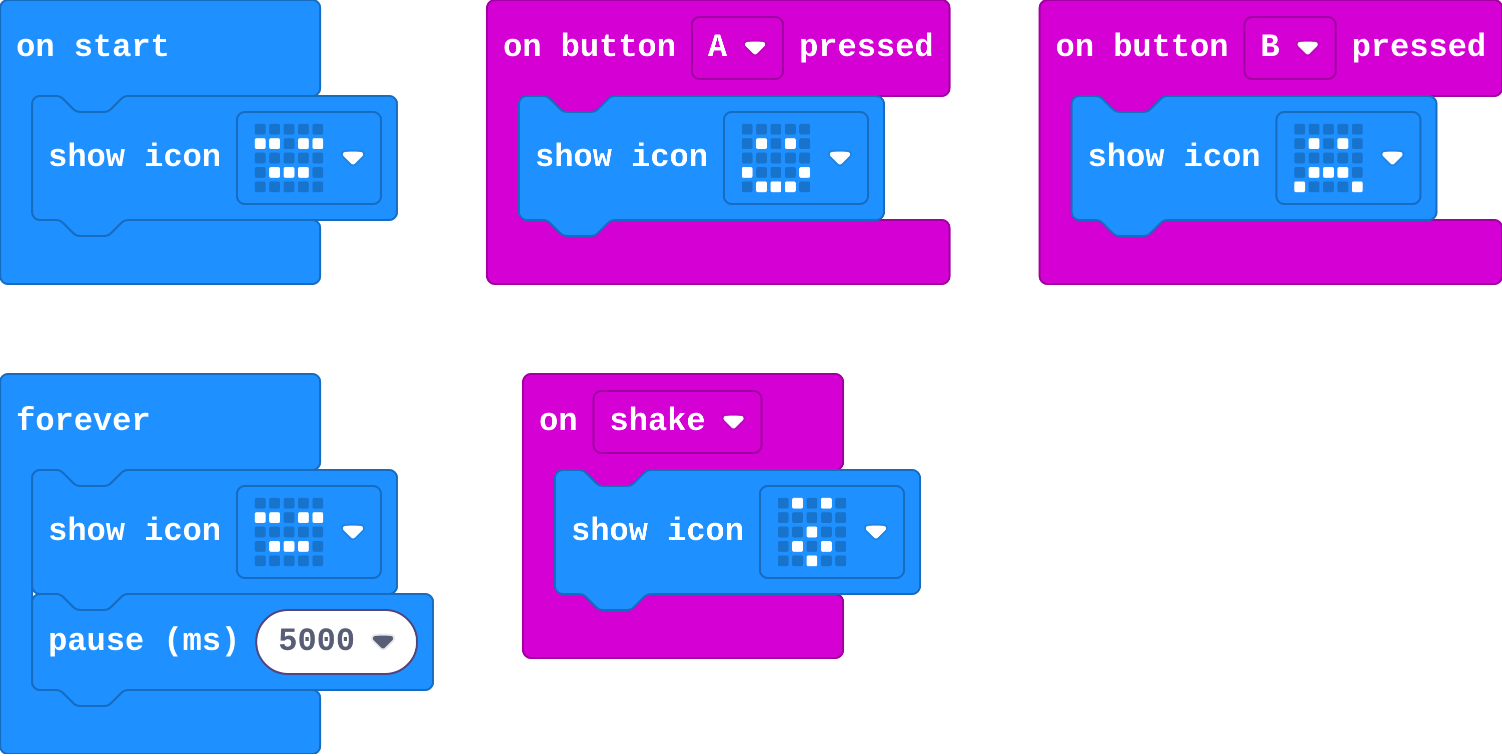
Show as code
basic.showIcon(IconNames.Asleep)
input.onButtonPressed(Button.A, function () {
    basic.showIcon(IconNames.Happy)
})
input.onButtonPressed(Button.B, function () {
    basic.showIcon(IconNames.Sad)
})
input.onGesture(Gesture.Shake, function () {
    basic.showIcon(IconNames.Surprised)
})
basic.forever(function () {
    basic.showIcon(IconNames.Asleep)
    basic.pause(5000)
})
Match each block with when its blocks run.
Work out how often an event block runs.
Ben's program used an if block from Logic. Read this for now: it asks a yes-or-no question, is A pressed right now?, and runs the blocks inside only if the answer is yes. You will use if properly in a later lesson.

Show as code
if (input.buttonIsPressed(Button.A)) {
    basic.showIcon(IconNames.Heart)
}
Match each block with when its blocks run.
You press A four times. How many times does the happy face appear?
Modify
Choose different pictures for A and B.
Need a hint?
Click the picture in a show icon block to choose a different one.
Add a third event block for A+B (both buttons at once). Make it show a picture of your choice.
Need a hint?
'on button A pressed' is in Input. Drag in another one.
Another hint
Click the A in the new block and choose A+B.
Add an event for pressing A and B together, and show a picture.
This ticks by itself when your blocks do what is asked.
Mix it up
Read the animation from the top, the way forever goes round it.

Show as code
basic.forever(function () {
    basic.showIcon(IconNames.Heart)
    basic.pause(200)
    basic.showIcon(IconNames.SmallHeart)
    basic.pause(200)
    basic.showIcon(IconNames.Yes)
    basic.pause(1000)
})
Make
Build a signal board for a bike rider:
- A shows an arrow pointing left.
- B shows an arrow pointing right.
- A+B shows a cross for "stop".
- Shake shows a surprised face.
Need a hint?
You need four event blocks: A, B, A+B and shake. Each one has one picture inside.
Another hint
show arrow is in Basic (click more...). Choose the direction with the dropdown.
A signal board: A, B, A+B and shake each show their own picture.
This ticks by itself when your blocks do what is asked.
Change a bike indicator
Real bike indicators flash. This one flashes each arrow twice. Make it flash three times, then make A+B flash a warning (both arrows, or a picture you draw).
For teachers
Students make programs that wait for a button press or a shake, and see that an event block runs its blocks every time its event happens, and only then. About 45 minutes.
Open the teacher guide: answers, solutions, slides and a worksheet.
Students will be able to
- I can make the micro:bit react when a button is pressed or it is shaken.
- I can say when on start, forever and an event block each run.
- I can add a new event block to react to something new.
Before class
An event is something that happens: a button press, a shake. An event block (such as on button A pressed) holds blocks that run every time that event happens, and only then. Compare with the last two lessons: on start runs once, forever runs again and again by itself. In the simulator, students click the A and B buttons, and click SHAKE for a shake. Try the Make yourself: four event blocks, one picture in each.
Running the lesson
- Predict: ask which blocks run straight away and which wait. Many students expect the faces to show at the start.
- Run: press A, B, A. Say it plainly: nothing happens until a button is pressed, and each press runs its own blocks.
- Investigate: the match task names when each kind of block runs. Ben's button is the classic mistake: a check in on start happens once, before anyone presses.
- Modify: changing a face changes what an event does. Adding A+B is a new event block, not a change to an old one.
- Mix it up: a quick look back at forever and pause.
- Make: four event blocks. show arrow is under Basic › more.
The hard part (on purpose)
An event block runs only when its event happens. When a press does nothing, ask which block the picture is inside.
When students get stuck
- Pressing a button does nothing. Ask: Which block is your picture inside? Fix: Put it inside 'on button A pressed' (from Input), not in on start.
- A+B never fires: A or B fires instead. Ask: Did you press both at once? Fix: In the simulator, click the A+B button below the micro:bit. On a real micro:bit, press both together.
- Two event blocks for the same button, and only one seems to work. Ask: How many 'on button A pressed' blocks are there? Fix: Keep one block per event, and put everything for that press inside it.
Stretch and support
Stretch: Make the signal board flash each arrow three times, and have shake show a short animation of three frames.
Support: Give students the four event blocks already placed and empty, and ask them only to fill in the pictures.
Where it leads
Next unit adds variables, so a button can count presses. Class ideas: a quiz buzzer where A and B are two teams. With real micro:bits: wear one on a bag strap as a bike signal.
What each step is for
- Investigate: An event block runs its blocks every time its event happens, and only then. on start and forever are not events you trigger: they run by themselves.
- Modify: To change what an event does, change the blocks inside it. To react to something new, add a new event block.
- Mix it up: forever goes round its blocks in order, and each pause sets how long that picture stays.
- Make the micro:bit react when a button is pressed or it is shaken.
- Say when on start, forever and an event block each run.
- Add a new event block to react to something new.