Pictures in order
Show words and pictures on the micro:bit, and see that blocks run once, from top to bottom.
A shop sign scrolls its name, then shows a picture. It is a short list of instructions, done in order.
The micro:bit has 25 small lights (LEDs) in a 5 by 5 grid. You program it with blocks, and the simulator (the picture of a micro:bit next to the blocks) runs your program straight away. No real micro:bit needed.
- Predict: Read the code and say what it will do before you run anything. A wrong guess is fine: it shows you what to look for.
- Run: Run it and compare the result with your prediction.
- Investigate: Trace how each line of code connects to what you see.
- Modify: Change the code on purpose and check the result.
- Make: Build something new using what you have learned. Expect a few tries; that is normal.
Make your prediction first. Help opens once you've locked it in.
Predict

Show as code
basic.showIcon(IconNames.Heart)
basic.showIcon(IconNames.SmallHeart)
These two blocks sit inside on start. Read them from the top, then lock in your prediction.
Run
The simulator runs the program by itself. Missed it? Press the restart button under the simulator.
Show as code
basic.showIcon(IconNames.Heart)
basic.showIcon(IconNames.SmallHeart)
Investigate
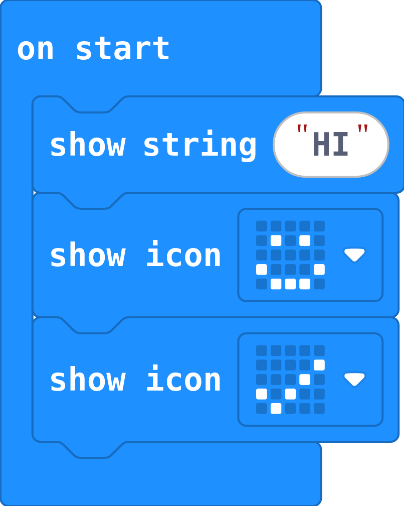
Show as code
basic.showString("HI")
basic.showIcon(IconNames.Happy)
basic.showIcon(IconNames.Yes)
Lily's sign is in the editor. Read it, then answer.
Drag the blocks so the tick comes first and HI scrolls last. The check ticks by itself as you build.
Change the order: the tick first, then the happy face, then HI.
This ticks by itself when your blocks do what is asked.
Modify
Add a show leds block at the end and draw a picture. Which picture stays on now?
Need a hint?
show leds is in Basic. Drag it under the last block.
Another hint
Click squares in the grid to light them.
Add show number at the very top. Type your favourite number.
Need a hint?
show number is in Basic. Drag it to the top and type a number.
Add a picture you draw with show leds at the end.
This ticks by itself when your blocks do what is asked.
Add a show number block at the very start.
This ticks by itself when your blocks do what is asked.
Make
Make a name badge. Your name scrolls across, then a picture you drew stays on the screen.
Need a hint?
show string is in Basic. Type your name into it.
Another hint
Put show leds under show string, so the picture comes last and stays on.
A name badge: your name scrolls, then a picture you draw stays on.
This ticks by itself when your blocks do what is asked.
Change a door sign
This door sign scrolls a word, then shows a face. Make it the sign for your classroom door: your room number, then a picture that says what happens inside.
For teachers
Students see that blocks in on start run once, from the top, so the order of the blocks is the order of the pictures, and the last one stays. About 35 minutes.
Open the teacher guide: answers, solutions, slides and a worksheet.
Students will be able to
- I can say what the micro:bit will show, in order.
- I can say why the last picture stays on.
- I can make a name badge from words and a picture I draw.
Before class
No micro:bits needed: the simulator (the micro:bit picture beside the blocks) runs every program. Blocks in on start run once, when the micro:bit switches on, one after another from the top. This lesson is only about that order; the next one adds forever. Try the Make yourself: your name in show string, then a show leds picture (click the squares to light them).
Running the lesson
- Predict: take a vote. 'Both hearts at once' is the common wrong answer. Ask: how many blocks does the micro:bit do at a time?
- Run: the small heart stays. Say it plainly: blocks run top to bottom, once, and the last picture stays on.
- Investigate: students change the order of Lily's sign in the editor; the check ticks when it is right.
- Modify: show leds is the first time students draw. Ask which picture stays on after they add it.
- Make: the name badge. Let students show each other.
The hard part (on purpose)
Seeing that the blocks run one at a time. Ask which block ran last, instead of telling them.
When students get stuck
- Only the last picture seems to show. Ask: Press restart and watch the very start. What scrolls first? Fix: Every block runs, one after another. The last one stays, so it is easy to miss the others.
- A show leds block shows nothing. Ask: Which squares did you light? Fix: Click squares in the grid to turn them on.
- The blocks sit outside on start and are greyed out. Ask: Which block are they inside? Fix: Drag them inside on start until the block hugs them.
Stretch and support
Stretch: Make a badge that shows three things in a row, ending with the picture that should stay on all day.
Support: Give students the show string block already in on start, and ask them only to add and draw the show leds picture.
Where it leads
Next lesson: forever, so the pictures repeat instead of stopping on the last one. With real micro:bits, press Download and drag the file onto the micro:bit to run it for real.
What each step is for
- Investigate: Blocks in on start run once, one after another from the top, so the order of the blocks is the order you see, and the last picture stays.
- Modify: show leds is a picture you draw yourself. It is one more block in the list, run in its turn.
- Say what the micro:bit will show, in order.
- Say why the last picture stays on.
- Make a name badge from words and a picture I draw.