A radio bridge
A micro:bit on the cable relays messages by radio, so the micro:bit doing the work can be anywhere in the room. The bridge passes radio to serial one way and serial to radio the other.
Smart-home sensors, farm soil probes and wildlife cameras send their readings by radio to one hub, and the hub passes them on to a computer. The hub is a bridge.
A micro:bit on a cable can't go far. In this lesson a second micro:bit, anywhere in the room, sends its readings by radio to the micro:bit on the cable, which passes them on to the computer. That micro:bit is a bridge.
The same program goes on both micro:bits: each part only does something on the micro:bit where it makes sense. In the simulator you will see two micro:bits running it.
Readings travel with radio send value (in Radio): a short name, such as temp, and a number together. on radio received value gives the bridge both, as name and value. A name can be 8 characters at most: a longer one, such as temperature, is cut short on the way.
- Predict: Read the code and say what it will do before you run anything. A wrong guess is fine: it shows you what to look for.
- Run: Run it and compare the result with your prediction.
- Investigate: Trace how each line of code connects to what you see.
- Modify: Change the code on purpose and check the result.
- Make: Build something new using what you have learned. Expect a few tries; that is normal.
Make your prediction first. Help opens once you've locked it in.
Predict
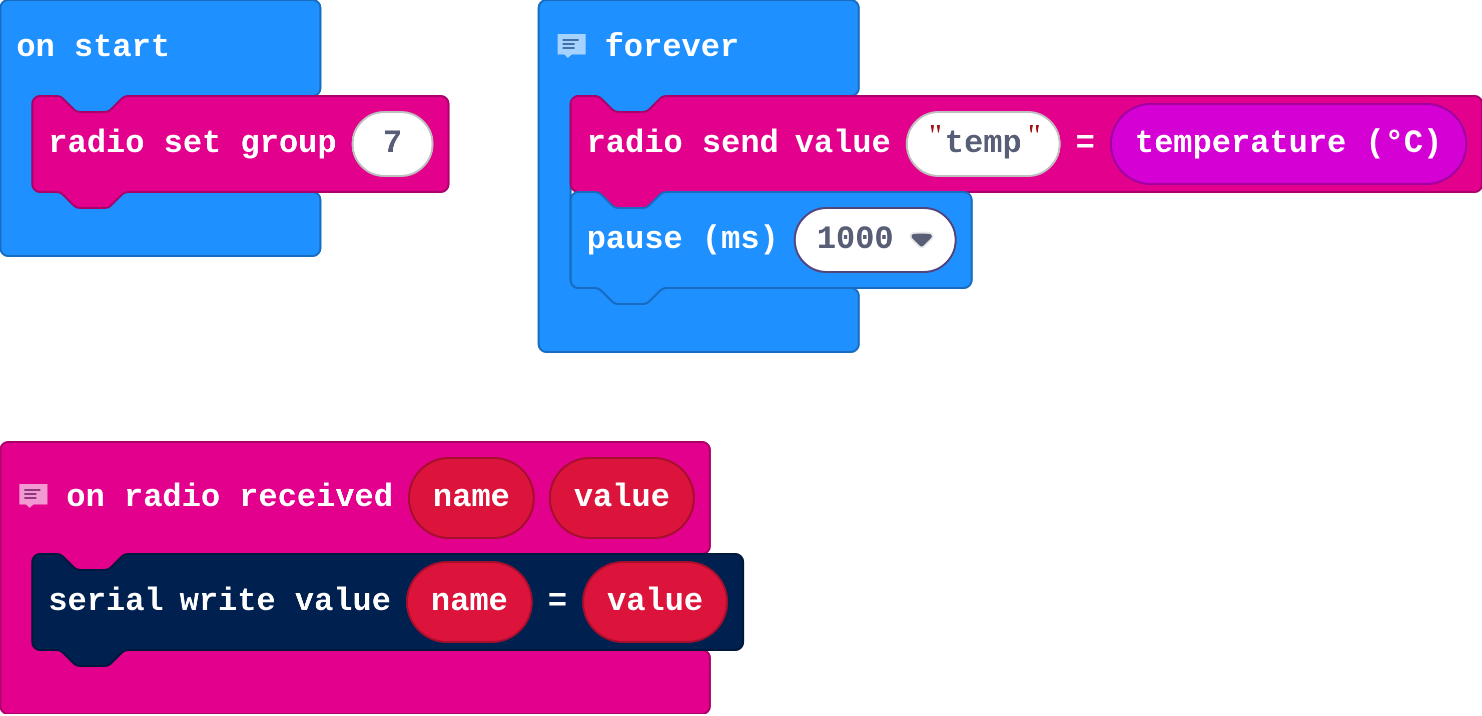
Show as code
// Bridge: radio to the computer
radio.onReceivedValue(function (name, value) {
    serial.writeValue(name, value)
})
// Sensor: send the temperature by radio every second
basic.forever(function () {
    radio.sendValue("temp", input.temperature())
    basic.pause(1000)
})
radio.setGroup(7)
Run
The simulator runs the program on two micro:bits. Change the temperature on one of them, then open Show data to see what the other passes on.
Show as code
// Bridge: radio to the computer
radio.onReceivedValue(function (name, value) {
    serial.writeValue(name, value)
})
// Sensor: send the temperature by radio every second
basic.forever(function () {
    radio.sendValue("temp", input.temperature())
    basic.pause(1000)
})
radio.setGroup(7)
Across the room
Download the program to two micro:bits. Plug one in and connect it here; put the other on a battery pack across the room (or hold it in your hands to warm it up).
Collect at least 5 temperature readings through the bridge.
Use the board. This ticks when you get there.
Investigate
Show as code
// Bridge: radio to the computer
radio.onReceivedValue(function (name, value) {
    serial.writeValue(name, value)
})
// Sensor: send the temperature by radio every second
basic.forever(function () {
    radio.sendValue("temp", input.temperature())
    basic.pause(1000)
})
radio.setGroup(7)

Show as code
radio.onReceivedValue(function (name, value) {
    serial.writeValue(name, value)
})
radio.setGroup(8)
Match each block with the job it does in the bridge.
Modify
Send the light level as well. Did you have to change the bridge?
Need a hint?
In forever, add radio send value light, light level.
Add the other direction: the bridge passes each line from the computer on by radio, and the far micro:bit beeps when it receives beep.
Need a hint?
On serial data received: radio send string, read line. That is the computer-to-radio direction.
Another hint
On radio received string: if receivedString = beep, play a tone (Music).
The far micro:bit sends its light level too.
This ticks by itself when your blocks do what is asked.
The computer can send beep through the bridge, and the far micro:bit beeps.
This ticks by itself when your blocks do what is asked.
Make
Make a room monitor: the far micro:bit reports temperature and light every second, shows an alarm (a cross) when the computer sends alarm, clears it on clear, and reports alarm 1 or alarm 0 so the computer knows it worked.
Need a hint?
The bridge part: serial to radio, and radio to serial (from the last step).
Another hint
The far part: send temp and light every second; on radio received string alarm show a cross and send alarm 1; clear clears the screen and sends alarm 0.
A room monitor: a bridge both ways; the far micro:bit sends temperature and light every second, shows an alarm on alarm and clears on clear, and reports alarm 1 or 0.
This ticks by itself when your blocks do what is asked.
Test the monitor
Download your monitor to two micro:bits, connect the bridge here, and try Alarm and Clear.
Use the board to set and clear the alarm, and see alarm 1 and 0 come back.
Use the board. This ticks when you get there.
For teachers
Students build a radio bridge, so a micro:bit across the room sends readings to the computer and receives commands from it. About 50 minutes.
Open the teacher guide: answers, solutions, slides and a worksheet.
Students will be able to
- I can pass radio messages on to the computer, and lines from the computer on by radio.
- I can explain why both micro:bits need the same radio group.
- I can explain why a micro:bit never hears its own radio messages.
Before class
The idea: a bridge relays. On the micro:bit plugged into the computer, on radio received value → serial write value passes radio readings to the computer, and on serial data received → radio send string passes lines from the computer on by radio. The micro:bit across the room only uses radio.
One program on both micro:bits: each part only does something on the micro:bit where it matters (the bridge also sends its own temperature by radio, but no other micro:bit passes it on, and a micro:bit never hears its own messages). This keeps the lesson to one program; in the simulator, a radio program runs on two micro:bits.
Hardware: two micro:bits per pair (one with a battery pack), a data cable and Chrome or Edge. The board steps are typical, so classes without hardware use the simulator's Show data. Give every pair its own radio group before anyone downloads, or bridges pick up other pairs' readings.
Running the lesson
- Predict: some say a bare number. Ask: which block sends the name?
- Across the room: warming the far micro:bit in your hands shows the graph rising.
- Investigate: the match is the whole idea; Ben's group is the Foundations slip again.
- Modify: point out that sending light needed no change to the bridge.
The hard part (on purpose)
Three parts in a chain: far micro:bit, bridge, computer. When nothing arrives, ask them to check each link in turn, starting with the radio group.
When students get stuck
- Nothing arrives on the board. Ask: Are both micro:bits in the same radio group? Is the far one switched on? Fix: Use the same group; check the battery pack.
- Readings from another pair appear. Ask: Which radio group are you using? Fix: Choose your own group number and download to both again.
- Commands from the board do nothing on the far micro:bit. Ask: Does the bridge pass lines from the computer on by radio? Fix: Add on serial data received → radio send string (read line).
Stretch and support
Stretch: Use three micro:bits: two sensors in different rooms, each sending its own name (temp1, temp2), and graph both.
Support: Give the bridge part complete; students write only the far micro:bit's part.
Where it leads
Next: train a model and let its labels travel the same path. Real world: smart-home hubs, farm sensor networks, wildlife monitoring.
What each step is for
- Across the room: With two real micro:bits, the readings from one arrive on the computer through the other: the bridge is just relaying.
- Investigate: A bridge relays: radio in becomes serial out, and (with one more block) serial in becomes radio out. Both micro:bits must share a radio group.
- Modify: Adding a value on the far side needs no change to the bridge; adding the computer-to-radio direction needs one more block.
- Pass radio messages on to the computer, and lines from the computer on by radio.
- Explain why both micro:bits need the same radio group.
- Explain why a micro:bit never hears its own radio messages.