Drive with gestures
A model's label reaches the robot as a word, and the robot turns it into a mode. The robot keeps acting on the last mode until a new label arrives.
Some wheelchairs and drones can be steered by head movements or hand signs instead of a joystick. A camera and a trained model turn each movement into a command.
You have trained a model (Train a recycling sorter), sent its labels to a micro:bit, and built a radio bridge (micro:bit and the computer). Now the labels drive a robot. Train a model with four hand gestures, Forward, Left, Right and Stop, and the bridge passes each label on to the robot by radio.
In the simulator, the micro:bit's buttons stand in for the model: A sends Left, B sends Right, A+B sends Forward and the logo sends Stop. With radio, the simulator shows two robots, and each micro:bit's buttons drive the other robot.
- Predict: Read the code and say what it will do before you run anything. A wrong guess is fine: it shows you what to look for.
- Run: Run it and compare the result with your prediction.
- Investigate: Trace how each line of code connects to what you see.
- Modify: Change the code on purpose and check the result.
- Make: Build something new using what you have learned. Expect a few tries; that is normal.
Make your prediction first. Help opens once you've locked it in.
Predict

Show as code
radio.onReceivedString(function (receivedString) {
    mode = receivedString
})
basic.forever(function () {
    if (mode == "Forward") {
        robot.motorTank(50, 50)
    } else if (mode == "Left") {
        robot.motorTank(-30, 30)
    } else if (mode == "Right") {
        robot.motorTank(30, -30)
    } else {
        robot.motorStop()
    }
})
// Test remote: the buttons send what the model would send.
input.onButtonPressed(Button.A, function () {
    radio.sendString("Left")
})
input.onButtonPressed(Button.B, function () {
    radio.sendString("Right")
})
input.onButtonPressed(Button.AB, function () {
    radio.sendString("Forward")
})
input.onLogoEvent(TouchButtonEvent.Pressed, function () {
    radio.sendString("Stop")
})
let mode = ""
robot.elecfreaksCuteBot.start()
radio.setGroup(7)
Run
Press A+B on one micro:bit and watch the other robot. Then try A, B and the logo.
Show as code
radio.onReceivedString(function (receivedString) {
    mode = receivedString
})
basic.forever(function () {
    if (mode == "Forward") {
        robot.motorTank(50, 50)
    } else if (mode == "Left") {
        robot.motorTank(-30, 30)
    } else if (mode == "Right") {
        robot.motorTank(30, -30)
    } else {
        robot.motorStop()
    }
})
// Test remote: the buttons send what the model would send.
input.onButtonPressed(Button.A, function () {
    radio.sendString("Left")
})
input.onButtonPressed(Button.B, function () {
    radio.sendString("Right")
})
input.onButtonPressed(Button.AB, function () {
    radio.sendString("Forward")
})
input.onLogoEvent(TouchButtonEvent.Pressed, function () {
    radio.sendString("Stop")
})
let mode = ""
robot.elecfreaksCuteBot.start()
radio.setGroup(7)
Drive with your model
- In Teachable Machine, train four classes named exactly Forward, Left, Right and Stop (a hand sign each), and export with Upload my model.
- Download the robot program to the robot's micro:bit, and the bridge program below to a second micro:bit plugged into the computer.
- Paste your model link, click Load, Connect a micro:bit (the bridge), then Try it on the webcam.
The bridge program (from A radio bridge):
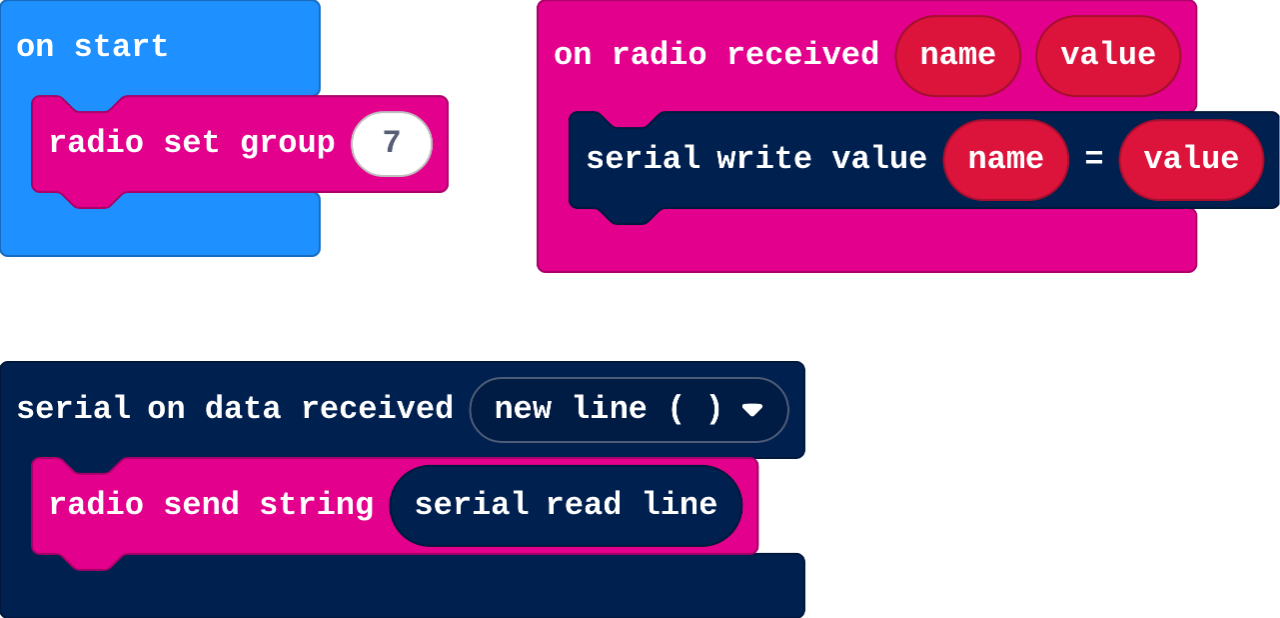
Show as code
serial.onDataReceived(serial.delimiters(Delimiters.NewLine), function () {
radio.sendString(serial.readLine())
})
radio.onReceivedValue(function (name, value) {
serial.writeValue(name, value)
})
radio.setGroup(7)
Drive the robot with your gestures: send Forward and Stop at least once each.
Use the board. This ticks when you get there.
Investigate
Show as code
radio.onReceivedString(function (receivedString) {
    mode = receivedString
})
basic.forever(function () {
    if (mode == "Forward") {
        robot.motorTank(50, 50)
    } else if (mode == "Left") {
        robot.motorTank(-30, 30)
    } else if (mode == "Right") {
        robot.motorTank(30, -30)
    } else {
        robot.motorStop()
    }
})
// Test remote: the buttons send what the model would send.
input.onButtonPressed(Button.A, function () {
    radio.sendString("Left")
})
input.onButtonPressed(Button.B, function () {
    radio.sendString("Right")
})
input.onButtonPressed(Button.AB, function () {
    radio.sendString("Forward")
})
input.onLogoEvent(TouchButtonEvent.Pressed, function () {
    radio.sendString("Stop")
})
let mode = ""
robot.elecfreaksCuteBot.start()
radio.setGroup(7)
Modify
Add a fifth label, Back. (With a real model, add a fifth class too.)
Need a hint?
Add an else if: mode = Back, with robot motor tank −50 −50.
Another hint
For testing, shaking the micro:bit sends Back (on shake: radio send string Back).
Make the robot's micro:bit show the first letter of each label it hears, so you can tell whether a wrong move came from the model or the code.
Need a hint?
In on radio received string, after setting the mode: show string, the first letter of the mode (Text › char from).
Add a Back label that drives the robot backwards (shake sends it in the simulator).
This ticks by itself when your blocks do what is asked.
The robot's micro:bit shows the first letter of each label it hears.
This ticks by itself when your blocks do what is asked.
Make
Make a gesture robot with four moves (Forward, Left, Right, Spin) that stops for any other word, with green lights while going forward and red when stopped. Add test-remote buttons so you can try it in the simulator.
Need a hint?
In forever: one branch per label (Forward, Left, Right, Spin), else stop.
Another hint
Robot set color is in Robot: green when going forward, red when stopped. Shake sends Spin for testing.
A gesture robot with Forward, Left, Right and Spin, stopping for anything else, green lights going forward and red when stopped.
This ticks by itself when your blocks do what is asked.
For teachers
Students drive a robot with hand gestures recognised by their own Teachable Machine model; each label becomes a mode the robot acts on until the next label. About 50 minutes.
Open the teacher guide: answers, solutions, slides and a worksheet.
Students will be able to
- I can turn labels from a model into moves on a robot.
- I can explain why the robot keeps doing the last thing it was told.
- I can make the robot do something safe with a word it doesn't know.
Before class
The idea: the model only names a gesture (Forward, Left…). The board sends that word to a bridge micro:bit on the computer, which passes it on by radio to the robot. The robot's on radio received string remembers the word as its mode, and forever acts on the mode until a new word arrives. So when the hand leaves the camera, the robot keeps going: the problem the next lesson fixes.
Prerequisites: Robotics challenges (modes, radio remote) and micro:bit and the computer (training in Teachable Machine, serial, the radio bridge). The bridge program is printed in the lesson.
Without robots: the simulator's buttons stand in for the model (A Left, B Right, A+B Forward, logo Stop), and with radio it shows two robots, each driven by the other micro:bit. The model step is typical.
With robots: per pair, a robot with its micro:bit, a second micro:bit as the bridge on a data cable, Chrome or Edge, and a webcam. Give each pair its own radio group. Gestures are hands only; photos stay in the browser, and Upload my model shares the model, not the photos.
Running the lesson
- Predict: many say it stops. Ask: what does forever do when no new message arrives?
- Run: watch the other robot, as in Remote control.
- Drive with your model: insist on class names that match exactly; Mia's robot is the reason.
- Investigate: the else as a safe default is the seed of the next lesson.
The hard part (on purpose)
Keeping the class names, the words sent and the robot's checks identical. When the robot ignores a gesture, ask them to read the label the board sends and the word the robot checks for.
When students get stuck
- The robot doesn't move when the webcam shows a gesture. Ask: Does the board show the label being sent? Are the bridge and robot in the same group? Fix: Connect the bridge on the board; match the radio groups.
- The robot stops whatever gesture is shown. Ask: Do your class names match the words in the robot's ifs exactly? Fix: Rename the classes (Forward, Left, Right, Stop), export and paste the new link.
- The robot jerks between moves. Ask: Does the model flicker between two gestures? Fix: Add more varied photos of the confused gestures, or hold each gesture still.
Stretch and support
Stretch: Add a gesture that plays a horn (robot play tone) without changing the mode.
Support: Run the lesson with the simulator buttons only; demonstrate the model drive at the front.
Where it leads
Next: the same robot driven by a model on a wrist micro:bit (CreateAI), with no camera or computer. Real world: gesture-controlled wheelchairs and drones.
What each step is for
- Drive with your model: With a real model, each gesture becomes a word on the robot's radio, and the robot behaves exactly as it did with the buttons.
- Investigate: The model only names a gesture; the robot's program decides what each name does and keeps doing it, so the label is a mode.
- Modify: A new gesture needs a new class in the model and a new branch on the robot; showing the mode helps you see what the robot heard.
- Turn labels from a model into moves on a robot.
- Explain why the robot keeps doing the last thing it was told.
- Make the robot do something safe with a word it doesn't know.