Delivery robot
Build a sign-driven delivery robot in three milestones. Its own distance sensor overrules the model, it reports back through the bridge, and it counts its deliveries.
Delivery robots on footpaths and in hospitals follow instructions, but their own sensors always get the last word: if something is in the way, they stop, whatever they were told.
The challenge puts the course together. You start from your careful sign robot (Signs: some mistakes cost more): Go after two Gos, Left and Right turn, everything else stops, with a watchdog. Then, in three milestones with less help each time:
- The robot's distance sensor overrules the model: something in the way means stop, whatever the sign says.
- The robot reports back through the bridge: its distance, and when it is blocked.
- It counts deliveries and makes the system yours.
In the simulator, the buttons stand in for the model (A Left, B Right, A+B Go, logo Stop). Drag a box in front of a robot to block it.
- Predict: Read the code and say what it will do before you run anything. A wrong guess is fine: it shows you what to look for.
- Run: Run it and compare the result with your prediction.
- Investigate: Trace how each line of code connects to what you see.
- Modify: Change the code on purpose and check the result.
- Make: Build something new using what you have learned. Expect a few tries; that is normal.
Make your prediction first. Help opens once you've locked it in.
Predict
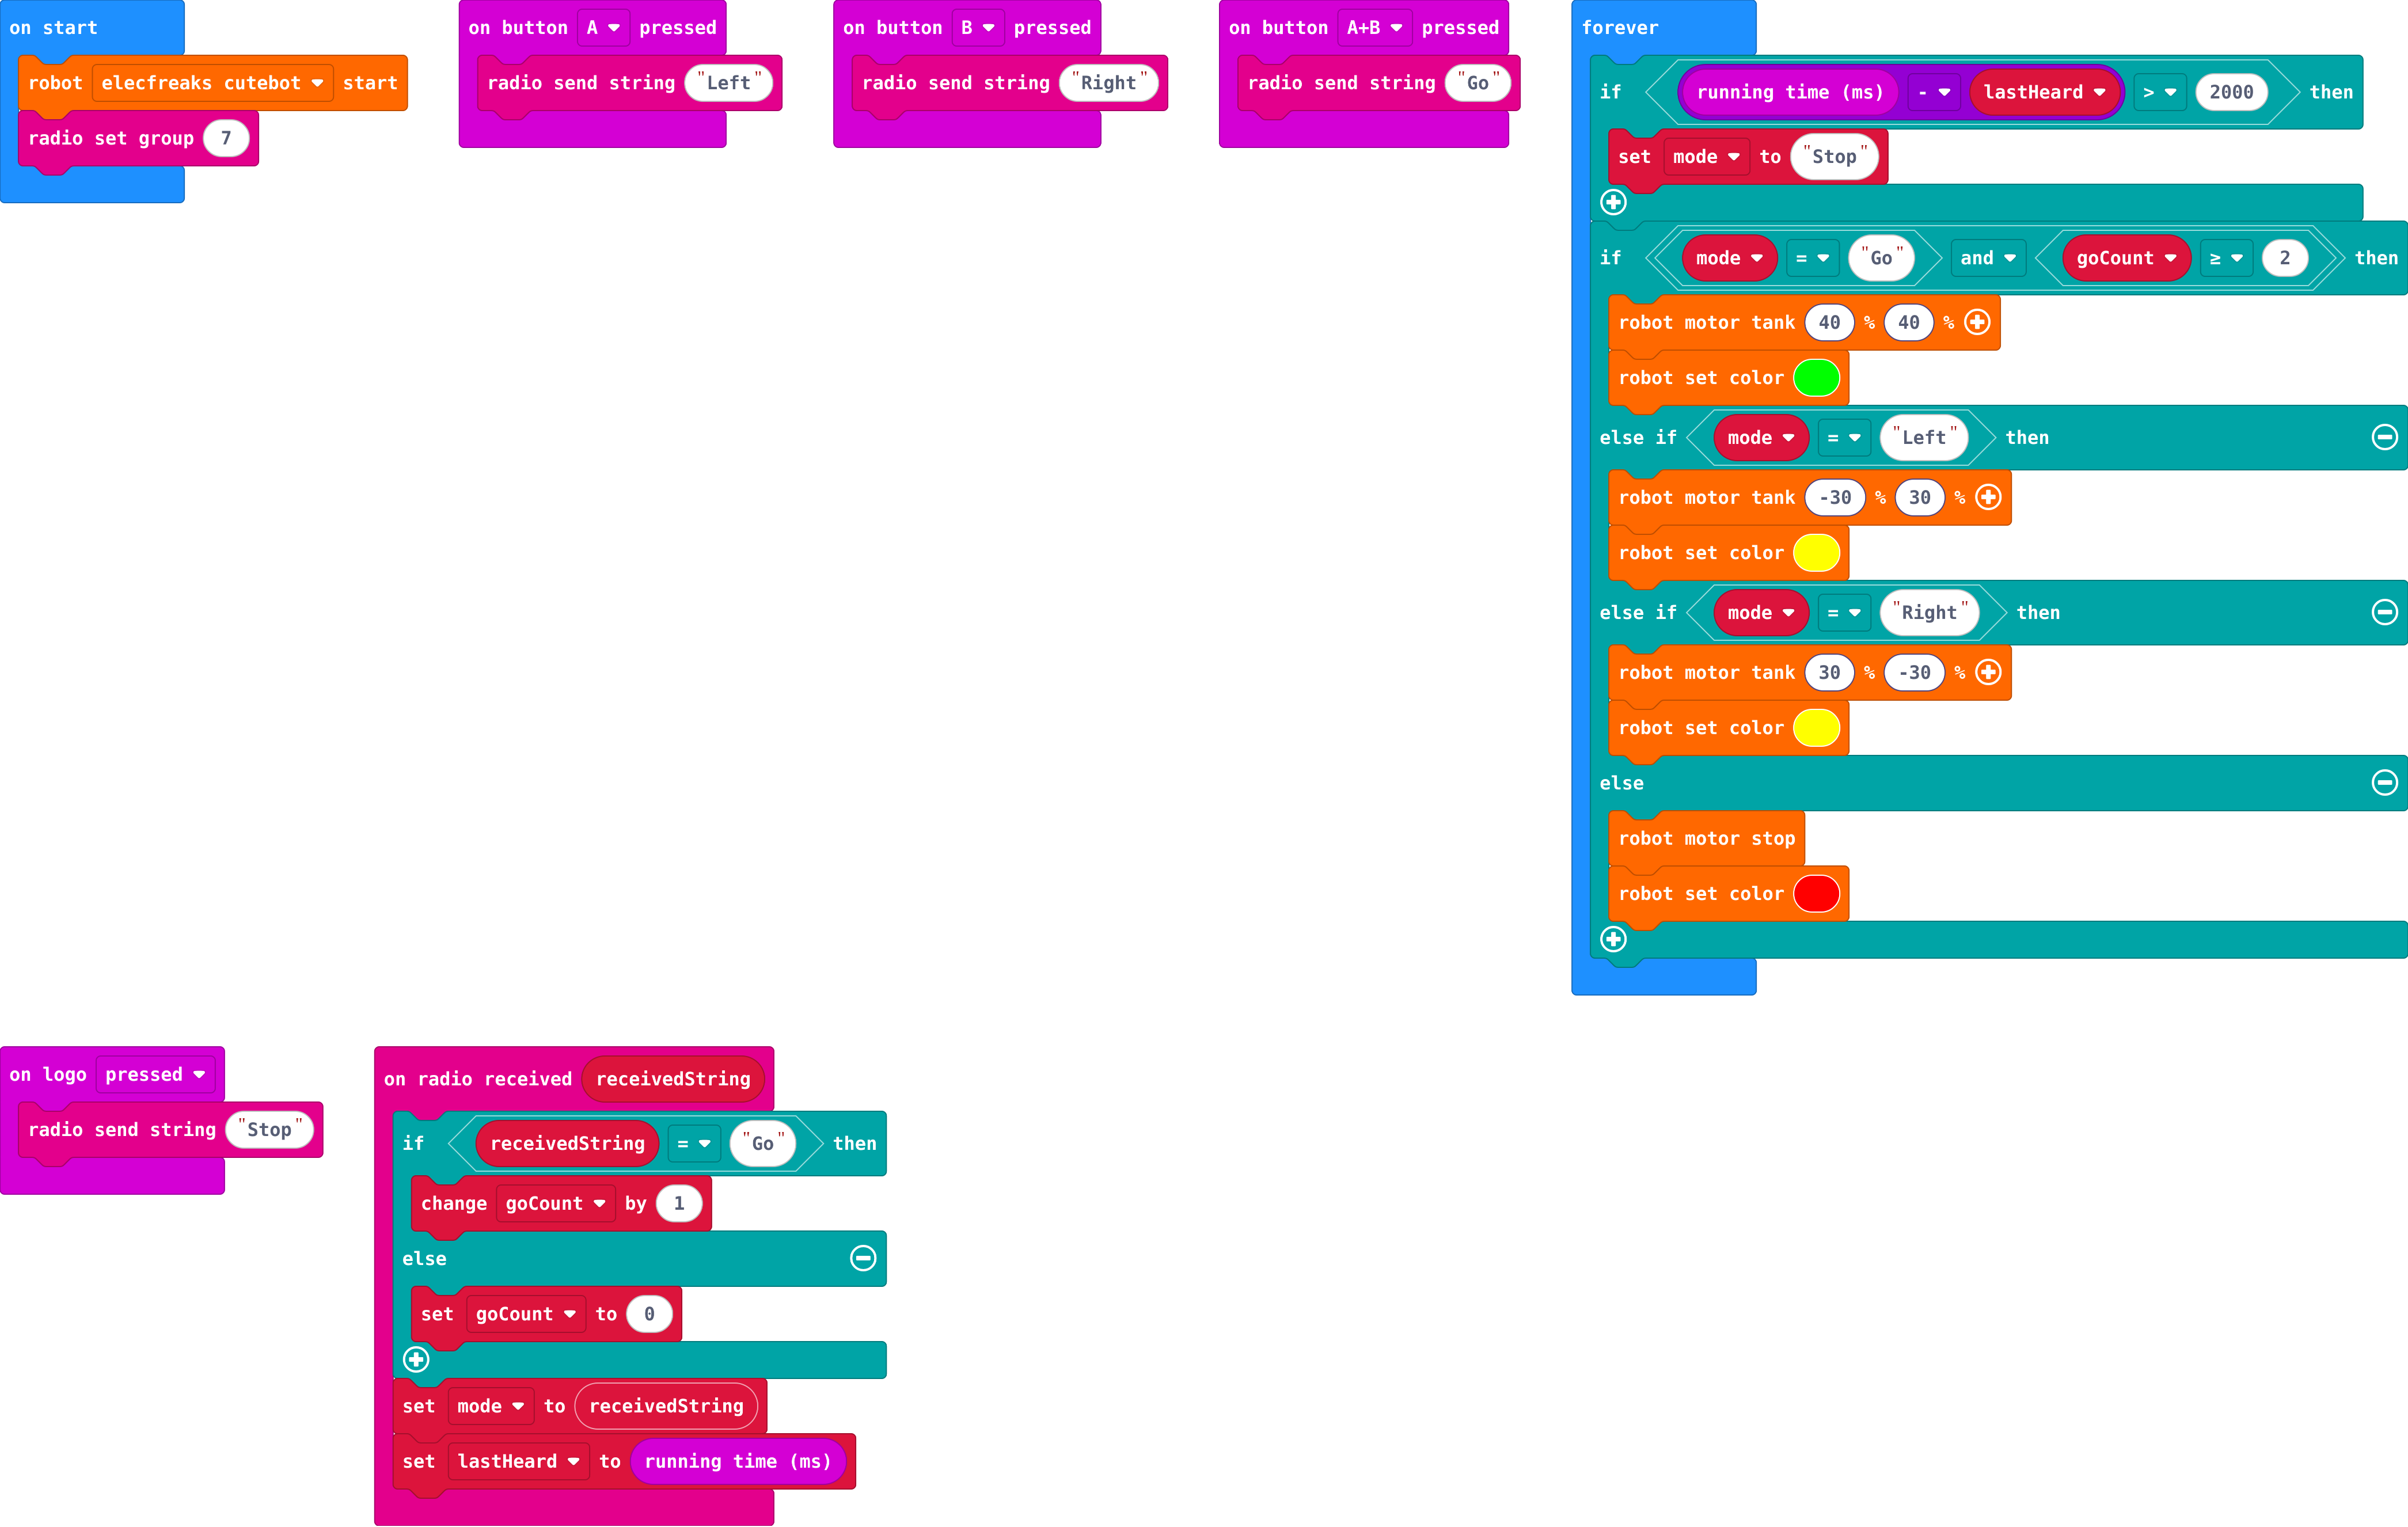
Show as code
radio.onReceivedString(function (receivedString) {
    if (receivedString == "Go") {
        goCount += 1
    } else {
        goCount = 0
    }
    mode = receivedString
    lastHeard = input.runningTime()
})
basic.forever(function () {
    if (input.runningTime() - lastHeard > 2000) {
        mode = "Stop"
    }
    if (mode == "Go" && goCount >= 2) {
        robot.motorTank(40, 40)
        robot.setColor(0x00ff00)
    } else if (mode == "Left") {
        robot.motorTank(-30, 30)
        robot.setColor(0xffff00)
    } else if (mode == "Right") {
        robot.motorTank(30, -30)
        robot.setColor(0xffff00)
    } else {
        robot.motorStop()
        robot.setColor(0xff0000)
    }
})
input.onButtonPressed(Button.A, function () {
    radio.sendString("Left")
})
input.onButtonPressed(Button.B, function () {
    radio.sendString("Right")
})
input.onButtonPressed(Button.AB, function () {
    radio.sendString("Go")
})
input.onLogoEvent(TouchButtonEvent.Pressed, function () {
    radio.sendString("Stop")
})
let goCount = 0
let lastHeard = 0
let mode = ""
robot.elecfreaksCuteBot.start()
radio.setGroup(7)
Run
Press A+B twice on one micro:bit, then drag a box in front of the other robot.
Show as code
radio.onReceivedString(function (receivedString) {
    if (receivedString == "Go") {
        goCount += 1
    } else {
        goCount = 0
    }
    mode = receivedString
    lastHeard = input.runningTime()
})
basic.forever(function () {
    if (input.runningTime() - lastHeard > 2000) {
        mode = "Stop"
    }
    if (mode == "Go" && goCount >= 2) {
        robot.motorTank(40, 40)
        robot.setColor(0x00ff00)
    } else if (mode == "Left") {
        robot.motorTank(-30, 30)
        robot.setColor(0xffff00)
    } else if (mode == "Right") {
        robot.motorTank(30, -30)
        robot.setColor(0xffff00)
    } else {
        robot.motorStop()
        robot.setColor(0xff0000)
    }
})
input.onButtonPressed(Button.A, function () {
    radio.sendString("Left")
})
input.onButtonPressed(Button.B, function () {
    radio.sendString("Right")
})
input.onButtonPressed(Button.AB, function () {
    radio.sendString("Go")
})
input.onLogoEvent(TouchButtonEvent.Pressed, function () {
    radio.sendString("Stop")
})
let goCount = 0
let lastHeard = 0
let mode = ""
robot.elecfreaksCuteBot.start()
radio.setGroup(7)
Investigate
Which part should decide each of these?
Milestone 1: the sensor wins
Need a hint?
Robot obstacle distance is in Robot › Sensors.
Another hint
In forever, before the Go branch: if obstacle distance < 15, then stop and set red; turn the old if into else if.
If something is closer than 15 cm, the robot stops and shows red, whatever the model says.
This ticks by itself when your blocks do what is asked.
Milestone 2: report back
- The robot sends its distance by radio twice a second.
- When it stops for something, it sends blocked 1, once; when the way is clear, blocked 0, once.
The bridge passes these on to the board, where they appear as values (in_dist, in_blocked).
Need a hint?
A second forever: radio send value dist, obstacle distance, then pause 500.
Another hint
A variable blocked (false at the start). When it stops for a box and blocked is false: radio send value blocked 1 and set blocked to true. When the way is clear again: send blocked 0 and set it to false.
The robot sends its distance twice a second, and sends blocked 1 once when it stops for something and blocked 0 once when the way is clear.
This ticks by itself when your blocks do what is asked.
Try the full system
Download milestone 2 to the robot, and the bridge program to the micro:bit on the computer. Drive with your signs and watch the robot's distance arrive. Block it with your hand.
Drive with your signs while the robot reports back: get Go sent, and at least 10 replies from the robot.
Use the board. This ticks when you get there.
Milestone 3: deliveries
Count deliveries: a Stop sign that arrives while the robot is going. Send the count back and show it when the robot is shaken. Then make it yours: a library book trolley, a lunch-order runner, a parcel robot. Change the signs, lights and sounds to suit.
Need a hint?
A delivery is a Stop sign that arrives while the robot was going (mode = Go).
Another hint
Send the count with send value. Pick a short name, such as done: names are 8 characters at most, so deliveries would be cut short.
The robot counts deliveries (a Stop that arrives while going), sends the count back, and shows it when shaken.
This ticks by itself when your blocks do what is asked.
On real robots
- Each team needs its own radio group for its bridge and robot.
- A real distance sensor misses thin things (chair legs) and soft things (a jumper). What else should a delivery robot check before it moves?
- Your robot trusts the model only for the sign, and its own sensor for safety. Real delivery robots do the same with many more sensors.
For teachers
Students build a sign-driven delivery robot in three milestones; its distance sensor overrules the model, it reports back through the bridge, and it counts deliveries. About 60 minutes.
Open the teacher guide: answers, solutions, slides and a worksheet.
Students will be able to
- I can make a robot's own sensor overrule a model's label.
- I can send a robot's readings back to the computer through a bridge.
- I can explain why a safety check goes first in an if, else if chain.
Before class
The challenge: everything from AI robots plus Robotics challenges. The robot starts as the careful sign robot (Go twice, Unsure and silence stop it). The milestones add no new blocks:
- The sensor wins:
if obstacle distance < 15 → stopgoes first in forever. The model only knows what the camera sees on the sign; the sensor knows what is in front of the robot. Jo's robot (the check last) is the mistake to watch for. - Report back: a second forever sends
disttwice a second;blocked 1andblocked 0go once each, using a variable (the same "send once" idea as Patrol and alert). The bridge turns them into lines such asdist:23, which the board shows as values. - Deliveries: a Stop that arrives while going is a delivery; count it, send it back, show it.
Without robots: every milestone works in the simulator (buttons stand in for the model; drag a box to block). The full-system step is typical.
Running the lesson
- Predict: most expect it to stop. Ask: which line looks at the box?
- Investigate: Jo's robot is the order mistake; trace the if, else if aloud with mode = Go.
- Milestone 2: check blocked is sent once, not every loop; the board's message list shows it.
- Milestone 3: let teams choose their delivery story and signs.
The hard part (on purpose)
Putting the sensor check first so it overrules the model. When the robot pushes boxes, ask which question in the chain is asked first.
When students get stuck
- The robot still pushes boxes. Ask: Where is the distance check in the if, else if chain? Fix: Make it the first if; turn the Go branch into else if.
- blocked arrives over and over. Ask: What stops it being sent again next time round forever? Fix: Send only if blocked is false, then set blocked to true.
- No values arrive on the board. Ask: Is the bridge connected, in the same radio group, running the bridge program? Fix: Connect the bridge and match the groups.
Stretch and support
Stretch: Make the robot slow down (motor tank 20) between 15 and 30 cm, and stop under 15.
Support: Give milestone 1's if complete; students write the reports in milestone 2.
Where it leads
Where this leads: real robots fuse a camera model with many sensors (distance, bump, line), and safety checks always win. The Python pathway's Machine learning with Gradio trains models in code.
What each step is for
- Investigate: The model knows only what the camera sees; the robot's sensor knows what is in front of it. The sensor must win, so its check comes first.
- Milestone 1: the sensor wins: A safety check that overrules everything else goes first in forever.
- Milestone 2: report back: The robot can send its own readings back through the bridge, so the person at the computer sees what the robot senses, not only what the model saw.
- Milestone 3: deliveries: A finished system counts what it has done and tells people, so they can trust it without watching it.
- Make a robot's own sensor overrule a model's label.
- Send a robot's readings back to the computer through a bridge.
- Explain why a safety check goes first in an if, else if chain.