---
marp: true
theme: default
html: true
---

# Remote control

Robotics challenges · Talk

<!-- Speaker note: Students turn a micro:bit into a radio remote control; each button sends a number and the robot turns each number into a move. About 45 minutes (Predict and Run 8 min · Investigate 10 min · Modify 12 min · Make 12 min · Real robot 3 min (optional)). -->

---

## Today

**We are learning to** one micro:bit sends numbers by radio; the robot turns each number into a move.

- I can send a number by radio when a button is pressed.
- I can make a robot choose a move for each number it receives.
- I can explain why the remote and robot need the same radio group and the same code.

<!-- Speaker note: Before class: Students used radio in micro:bit Foundations (Send and receive, Messages with meaning). Here the **remote** sends a number for each command and the **robot** decides what each number means, in **on radio received**. The two sides must agree on the **group** and on the **code** (1 = forward, 2 = turn, 0 = stop). A micro:bit never hears its own messages. When a program uses radio, the simulator runs it on **two micro:bits, each with a robot**, in one arena. Each is the remote for the other robot. This is a little odd at first; say it up front. With real hardware, the same program can go on both micro:bits. Untested on real hardware: whether the robot start block shows an error on a micro:bit that is not in a robot. If it does, give the remote a copy without that block. Real classrooms need a **different radio group for every pair**. MOVE Motor classes can use this lesson unchanged on the remote side, and Kitronik blocks on the robot side. Teacher: Real robot (optional): assign each pair a radio group before anyone downloads. -->

---

## Why it matters

> Rescue robots go into collapsed buildings and bomb-disposal robots up to suspicious bags, while the person driving stays far away and safe. Each button press is a short message over radio.

<!-- Speaker note: In micro:bit Foundations you sent radio messages between micro:bits. Now the messages drive a robot. The **remote** sends a number for each button; the **robot** listens and turns each number into a move. Both micro:bits must be in the same **radio group**. When a program uses radio, the simulator shows **two micro:bits and two robots**, running the same program. Each micro:bit is a remote for the **other** robot. -->

---

<span style="background:#dbeafe; color:#1a1a1a; border:1.5px solid #3b82f6; padding:6px 18px; border-radius:8px; font-size:1em; font-weight:500;">💬 Discussion</span>

## Predict

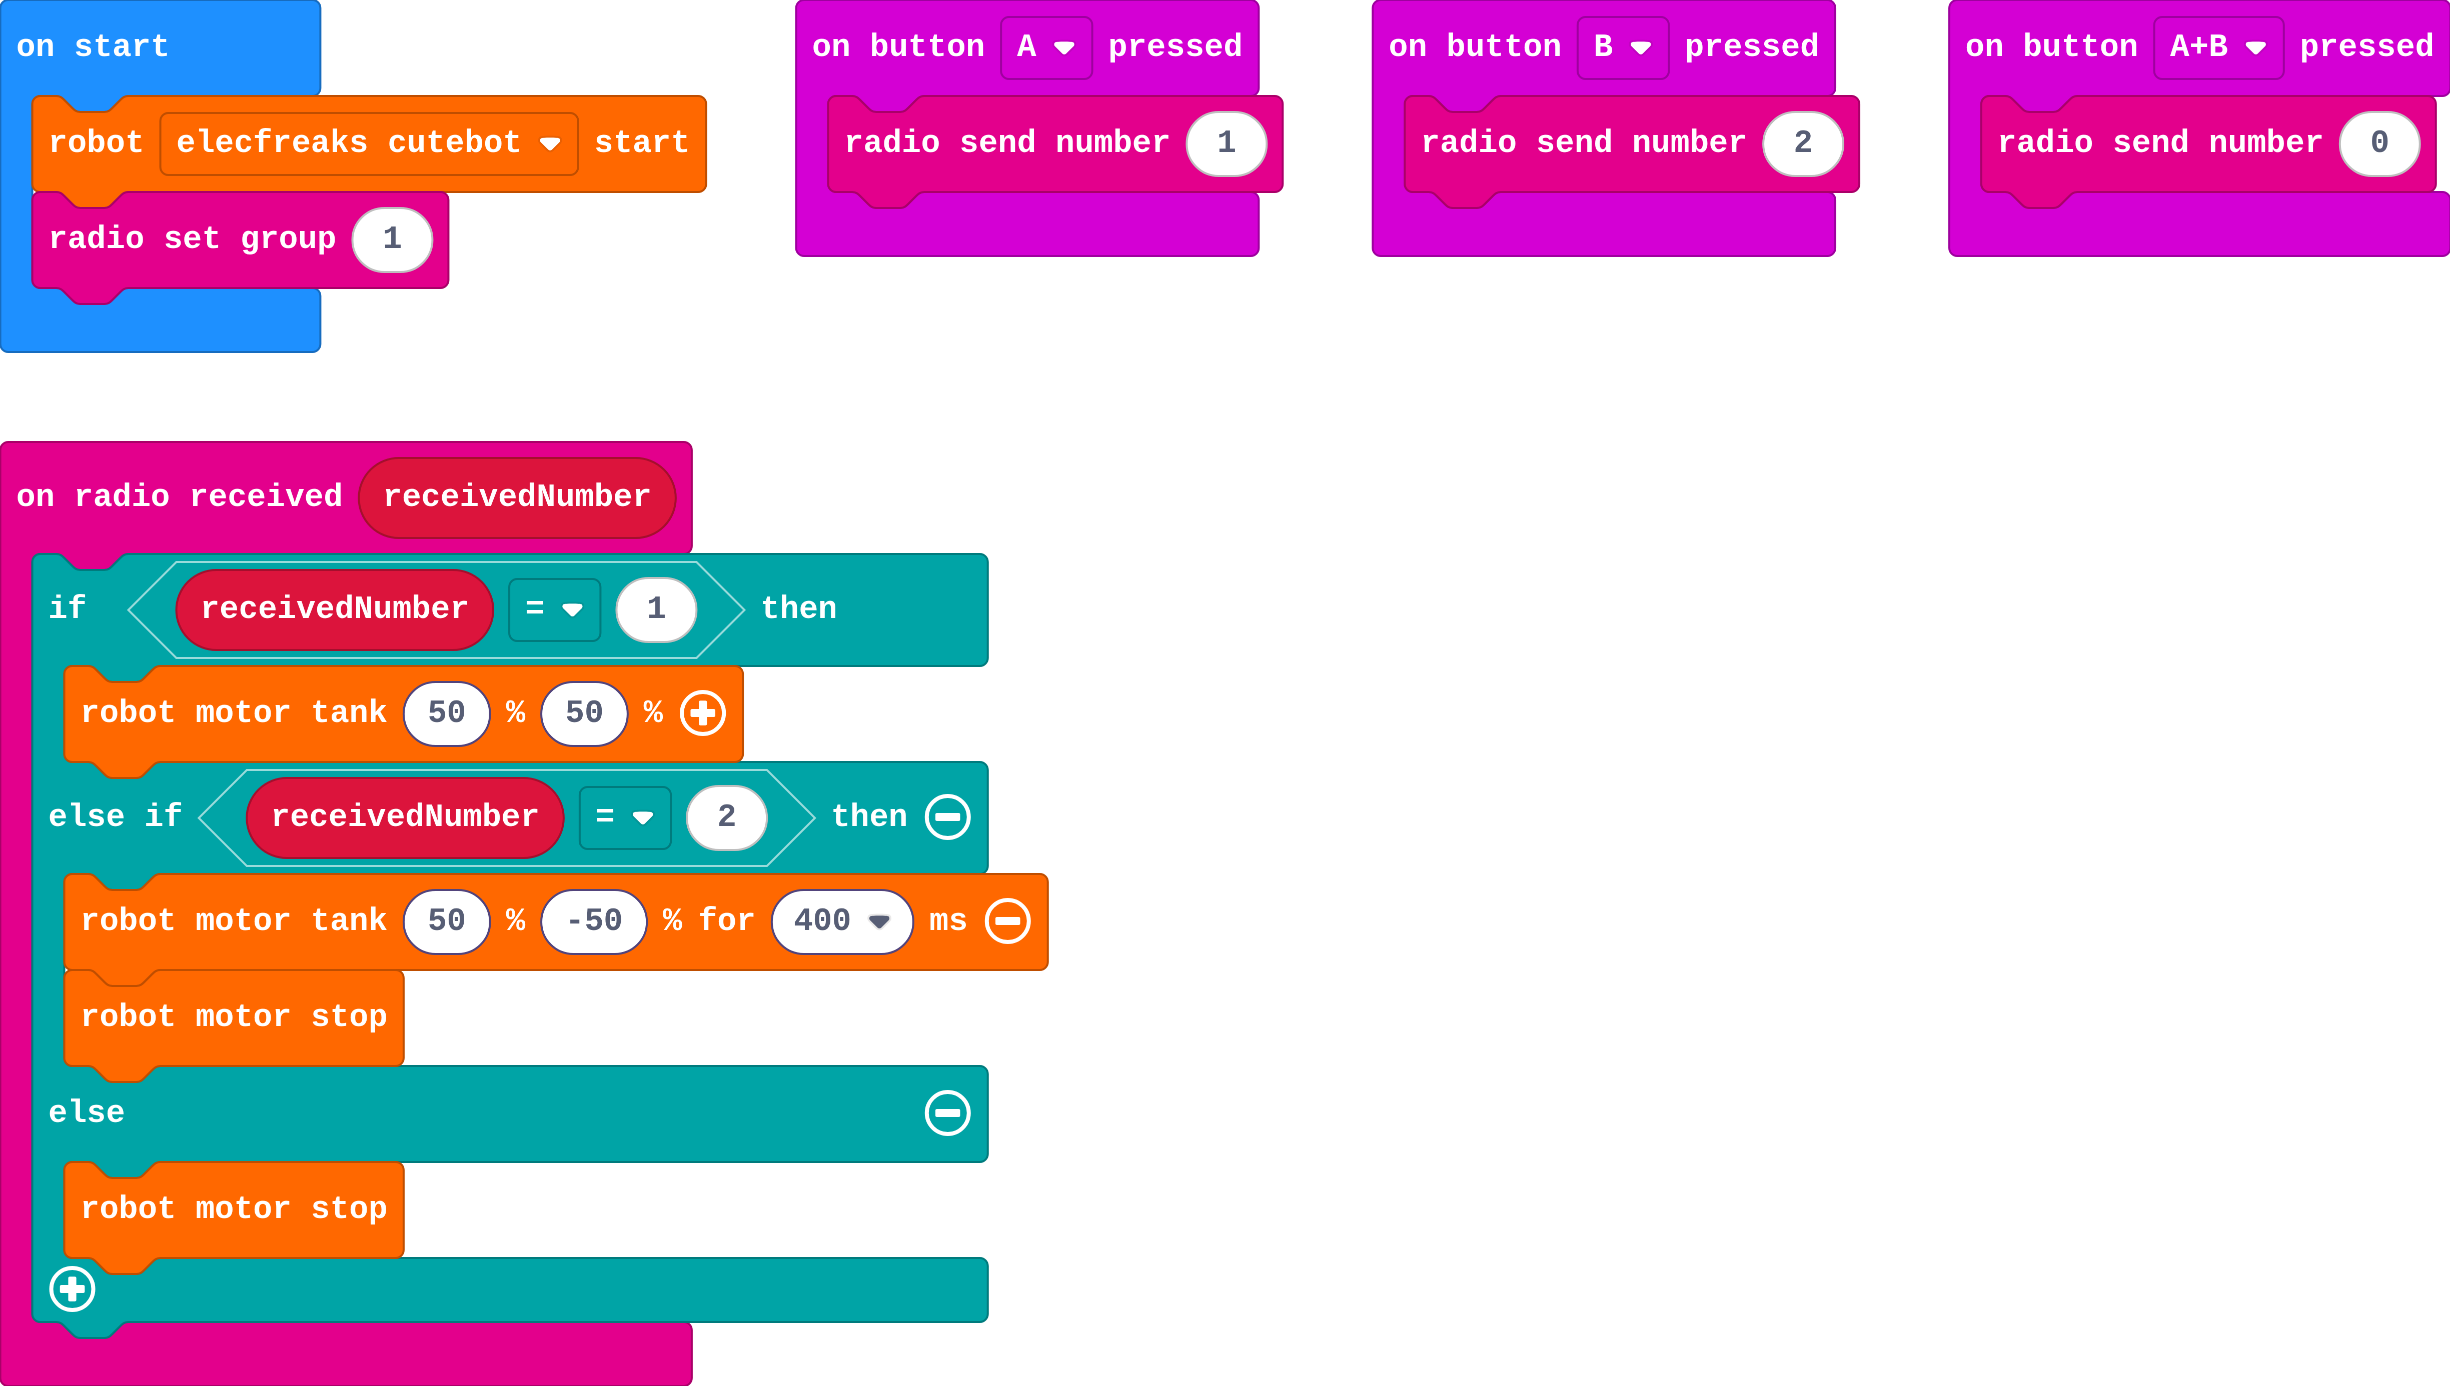
![h:360](https://studio.learningwaypoints.com/tutorials/_pictures/makecode/code/5d9e0881f8ca.png?v=96569019994c6731)

**You press A on the first micro:bit. Which robot drives forward?**

- The second robot
- Neither: radio cannot drive robots
- The first robot
- Both robots

<!-- Speaker note: What happens: The second robot. The first micro:bit sends 1; a micro:bit never hears its own messages, so only the second micro:bit receives 1 and drives its robot. Take two or three predictions before anyone runs it. -->

<!-- Speaker note: Teacher: many say the first robot. Ask: does a micro:bit hear its own radio? (Foundations: no.) -->

---

<span style="background:#dcfce7; color:#1a1a1a; border:1.5px solid #22c55e; padding:6px 18px; border-radius:8px; font-size:1em; font-weight:500;">✅ Check</span>

## What happened?

* The second robot. The first micro:bit sends 1; a micro:bit never hears its own messages, so only the second micro:bit receives 1 and drives its robot.

<!-- Speaker note: Reveal after running. Ask who predicted it, and what made them think so. -->

---

<span style="background:#fef3c7; color:#1a1a1a; border:1.5px solid #f59e0b; padding:6px 18px; border-radius:8px; font-size:1em; font-weight:500;">✍️ Activity</span>

## Run it

Open the lesson at this step and try it together.

[studio.learningwaypoints.com/tutorials/code/robotics/robot-remote/?full=step-2#step-2](https://studio.learningwaypoints.com/tutorials/code/robotics/robot-remote/?full=step-2#step-2)

<!-- Speaker note: Press **A**, **B** and **A+B** on the **first** micro:bit, and watch the **second** robot. Then try the buttons on the second micro:bit. Students should be able to say: I pressed A, B and A+B on one micro:bit and watched which robot moved. -->

<!-- Speaker note: Teacher: watch the other robot. Then swap: the second micro:bit drives the first robot. -->

---

<span style="background:#dbeafe; color:#1a1a1a; border:1.5px solid #3b82f6; padding:6px 18px; border-radius:8px; font-size:1em; font-weight:500;">💬 Discussion</span>

## Investigate

![h:360](https://studio.learningwaypoints.com/tutorials/_pictures/makecode/code/5d9e0881f8ca.png?v=96569019994c6731)

<!-- Speaker note: What this step is for: The remote only sends a number. The robot decides what each number means, so both sides must agree on the code and the radio group. -->

<!-- Speaker note: Teacher: write the code table on the board (1 forward, 2 turn, 0 stop). Ben's robot is the group mismatch from Foundations. -->

---

<span style="background:#dcfce7; color:#1a1a1a; border:1.5px solid #22c55e; padding:6px 18px; border-radius:8px; font-size:1em; font-weight:500;">✅ Check</span>

## The code

**Match each button with the number it sends and what the robot does.**

| | |
|---|---|
| `A sends 1` | A. stop |
| `B sends 2` | B. turn right a little, then stop |
| `A+B sends 0` | C. drive forward until told otherwise |

* Answer: A sends 1 → C. drive forward until told otherwise; B sends 2 → B. turn right a little, then stop; A+B sends 0 → A. stop

<!-- Speaker note:  -->

<style scoped>pre, marp-pre { font-size: 0.5em; line-height: 1.25; } section { font-size: 24px; }</style>

---

<span style="background:#dcfce7; color:#1a1a1a; border:1.5px solid #22c55e; padding:6px 18px; border-radius:8px; font-size:1em; font-weight:500;">✅ Check</span>

## Ben's robot

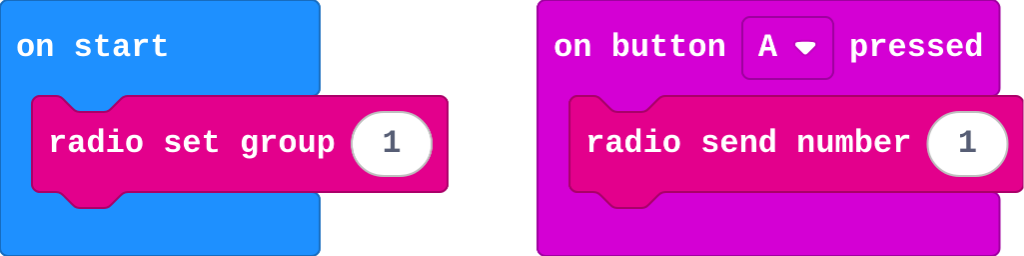
Ben's remote:

![h:128](https://studio.learningwaypoints.com/tutorials/_pictures/makecode/code/ab31241f151a.png?v=e824e799fe96d895)

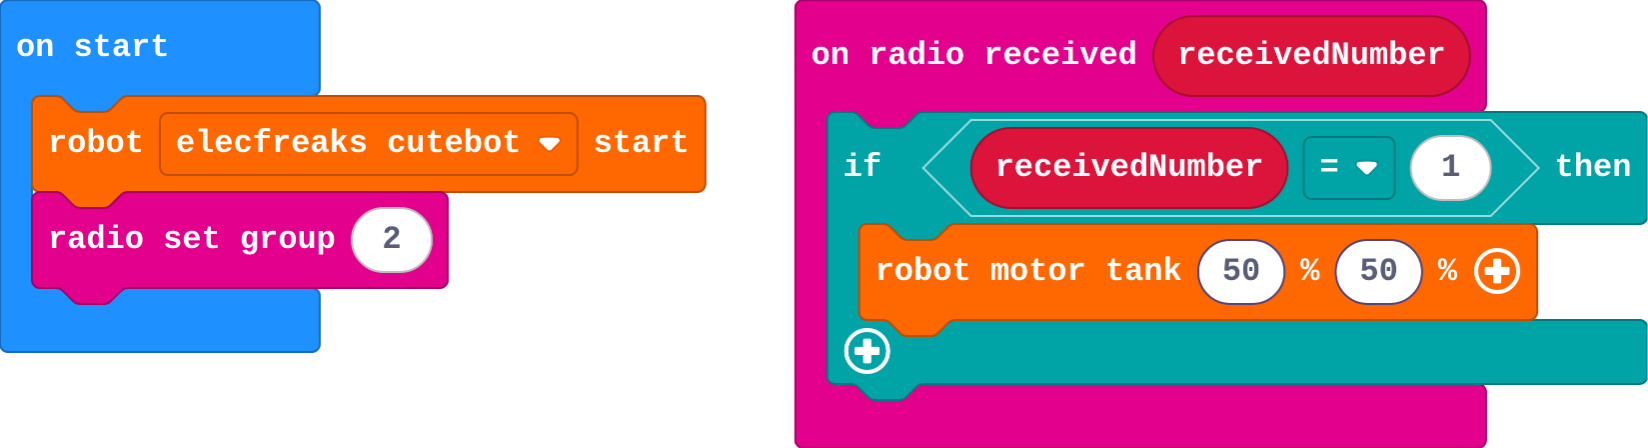
Ben's robot:

![h:224](https://studio.learningwaypoints.com/tutorials/_pictures/makecode/code/49eeb1dfa21f.png?v=ed323e7ae8d604d5)

**Ben has two programs: one for his remote, one for his robot. Pressing A does nothing. Why?**

- He should send a word, not a number
- The remote is in radio group 1 and the robot in group 2, so the robot never hears the message
- The robot needs a forever block
- Radio does not work with robots

* Answer: The remote is in radio group 1 and the robot in group 2, so the robot never hears the message

<!-- Speaker note: Radio messages only reach micro:bits in the same group. Ben's remote sends on group 1, but his robot listens on group 2. -->

<style scoped>pre, marp-pre { font-size: 0.5em; line-height: 1.25; } section { font-size: 18px; }</style>

---

<span style="background:#fef3c7; color:#1a1a1a; border:1.5px solid #f59e0b; padding:6px 18px; border-radius:8px; font-size:1em; font-weight:500;">✍️ Activity</span>

## Modify


- **Show the message:** A driver needs to know what the robot heard. Make the robot's micro:bit **show each number** it receives.
- **Reverse:** Add a fourth command: **shaking** the remote sends **3**, and the robot **backs up** for one second.

[Open this step](https://studio.learningwaypoints.com/tutorials/code/robotics/robot-remote/?full=step-4#step-4)

<!-- Speaker note: What this step is for: A new command needs a new number on the remote and a new branch on the robot. Hints, in order: show number is in Basic. Put it at the top of on radio received, and drag receivedNumber into it. / on shake sends 3. In on radio received, add an else if: receivedNumber = 3. / Inside it: robot motor tank −50 −50 for 1000 ms, then robot motor stop. For students who need more support: Give the robot side complete; students build the remote buttons to match the code table. For early finishers: Steer by tilting: in forever on the remote, send 1 when tilted left (acceleration x < −300), 2 when tilted right, and 0 when level. The hard part, on purpose: Both sides must agree on the code and the radio group. Ask which robot they're watching and what number was sent last. When students get stuck: Pressing a button moves nothing. Ask: Are you watching the other robot? Is radio set group the same in both? Fix: Watch the second robot; check both use the same group. / The robot drives off and never stops. Ask: Which command did you send last? Does forward have a time? Fix: Send the stop command, or give forward a time and a stop. / Two commands do the same thing. Ask: Does each button send a different number? Fix: Give each button its own number, and give the robot one branch per number. -->

<!-- Speaker note: Teacher: show number on the robot side is how real operators check what was heard. -->

---

<span style="background:#fef3c7; color:#1a1a1a; border:1.5px solid #f59e0b; padding:6px 18px; border-radius:8px; font-size:1em; font-weight:500;">✍️ Activity</span>

## Make

Make a remote for a **rescue robot** that moves in small, careful steps:

- **A**: turn a little left
- **B**: turn a little right
- **A+B**: drive forward for one second
- **logo**: stop

Use the first micro:bit to steer the second robot round a box and back.

[Open this step](https://studio.learningwaypoints.com/tutorials/code/robotics/robot-remote/?full=step-5#step-5)

<!-- Speaker note: Hints, in order: Four buttons: A, B, A+B and the logo. Each sends a different number. / In on radio received, one branch per number: small left turn, small right turn, forward for 1 second, stop. -->

<!-- Speaker note: Teacher: four commands, small steps. Challenge pairs to steer round a box and back. -->

<style scoped>pre, marp-pre { font-size: 0.5em; line-height: 1.25; } section { font-size: 24px; }</style>

---

## On a real robot

With real micro:bits, download the program to the **remote** and to the micro:bit in the **robot**. Things to notice:

- **Use your own radio group.** Every pair in the room needs a different group, or your remote drives someone else's robot.
- The remote does not need to be in a robot. If it shows an error without one, ask your teacher for a copy without the robot start block.
- Radio reaches across a classroom, but walls and bodies weaken it.

---

<span style="background:#dcfce7; color:#1a1a1a; border:1.5px solid #22c55e; padding:6px 18px; border-radius:8px; font-size:1em; font-weight:500;">✅ Check</span>

## Exit ticket

**The remote sends 2. Where is it decided what 2 means?**

* On the robot, in on radio received. The remote only sends the number; the robot's code turns it into a move.

<!-- Speaker note: Students answer on paper or a mini whiteboard before the reveal. Anyone who cannot answer needs the main idea again next lesson. Where this leads: Next: one micro:bit cues several robots to dance in time to music. Real-world links: rescue and bomb-disposal robots, drones, robots on Mars (where each message takes minutes to arrive, so the robot must also decide things for itself). -->