---
marp: true
theme: default
html: true
---

# One robot, many jobs

Robotics challenges · Modes

<!-- Speaker note: Students use a mode variable to give one robot several jobs (go, follow, stop); buttons change the mode and forever does the job, then they add explore and guard modes. About 50 minutes (Predict and Run 8 min · Investigate 10 min · Modify 15 min · Make 12 min · Real robot 5 min (optional)). -->

---

## Today

**We are learning to** a mode variable remembers which job the robot is doing; buttons change it, and forever does that job.

- I can use a variable to remember which job (mode) the robot is doing.
- I can change the mode with buttons, and make forever do the job for the current mode.
- I can add a new mode to a program.

<!-- Speaker note: Before class: This is the **state** pattern (in the curriculum, a variable that keeps track of what the program is doing). A variable called **mode** holds a word: "go", "follow" or "stop". The **buttons only change the mode**; **forever** checks the mode every time round and does that job. So a button press has a lasting effect, even though the button event itself is over in an instant. The mode values are words (strings) so programs read clearly: `if mode = "follow"`. In blocks, compare words with the **=** block from **Logic** and the text block from **Text**. **followLine** is lesson 5's program moved into a function, which keeps forever short. Ruby's robot is the reset-in-loop slip from micro:bit Foundations (Counting): a starting value set inside forever wipes every change. The logo (micro:bit V2 only) appears in the simulator; on a V1 micro:bit, use shake instead. MOVE Motor classes can use the same pattern with Kitronik blocks. Teacher: Real robot (optional): discuss why real devices often cycle modes with one button (lesson 7 and beyond). -->

---

## Why it matters

> A robot lawn mower has modes: mow, go home, pause. You press one button and it keeps doing that job until you choose another.

<!-- Speaker note: So far each program did one job. Real robots switch between jobs. The trick is a **variable** called **mode** that remembers which job is chosen. It holds a word, such as `"follow"`, and `mode = "follow"` (the compare block in **Logic**, with a text in it) asks whether it is that word. Text must match exactly, so `"Follow"` would not match. The buttons only **change** the mode; **forever** looks at the mode every time round and does that job. **followLine** is lesson 5's line follower, now in a function so forever stays easy to read. -->

---

<span style="background:#dbeafe; color:#1a1a1a; border:1.5px solid #3b82f6; padding:6px 18px; border-radius:8px; font-size:1em; font-weight:500;">💬 Discussion</span>

## Predict

![h:360](https://studio.learningwaypoints.com/tutorials/_pictures/makecode/code/4d1bd8397ecb.png?v=f5f8fe0f3af2e31f)

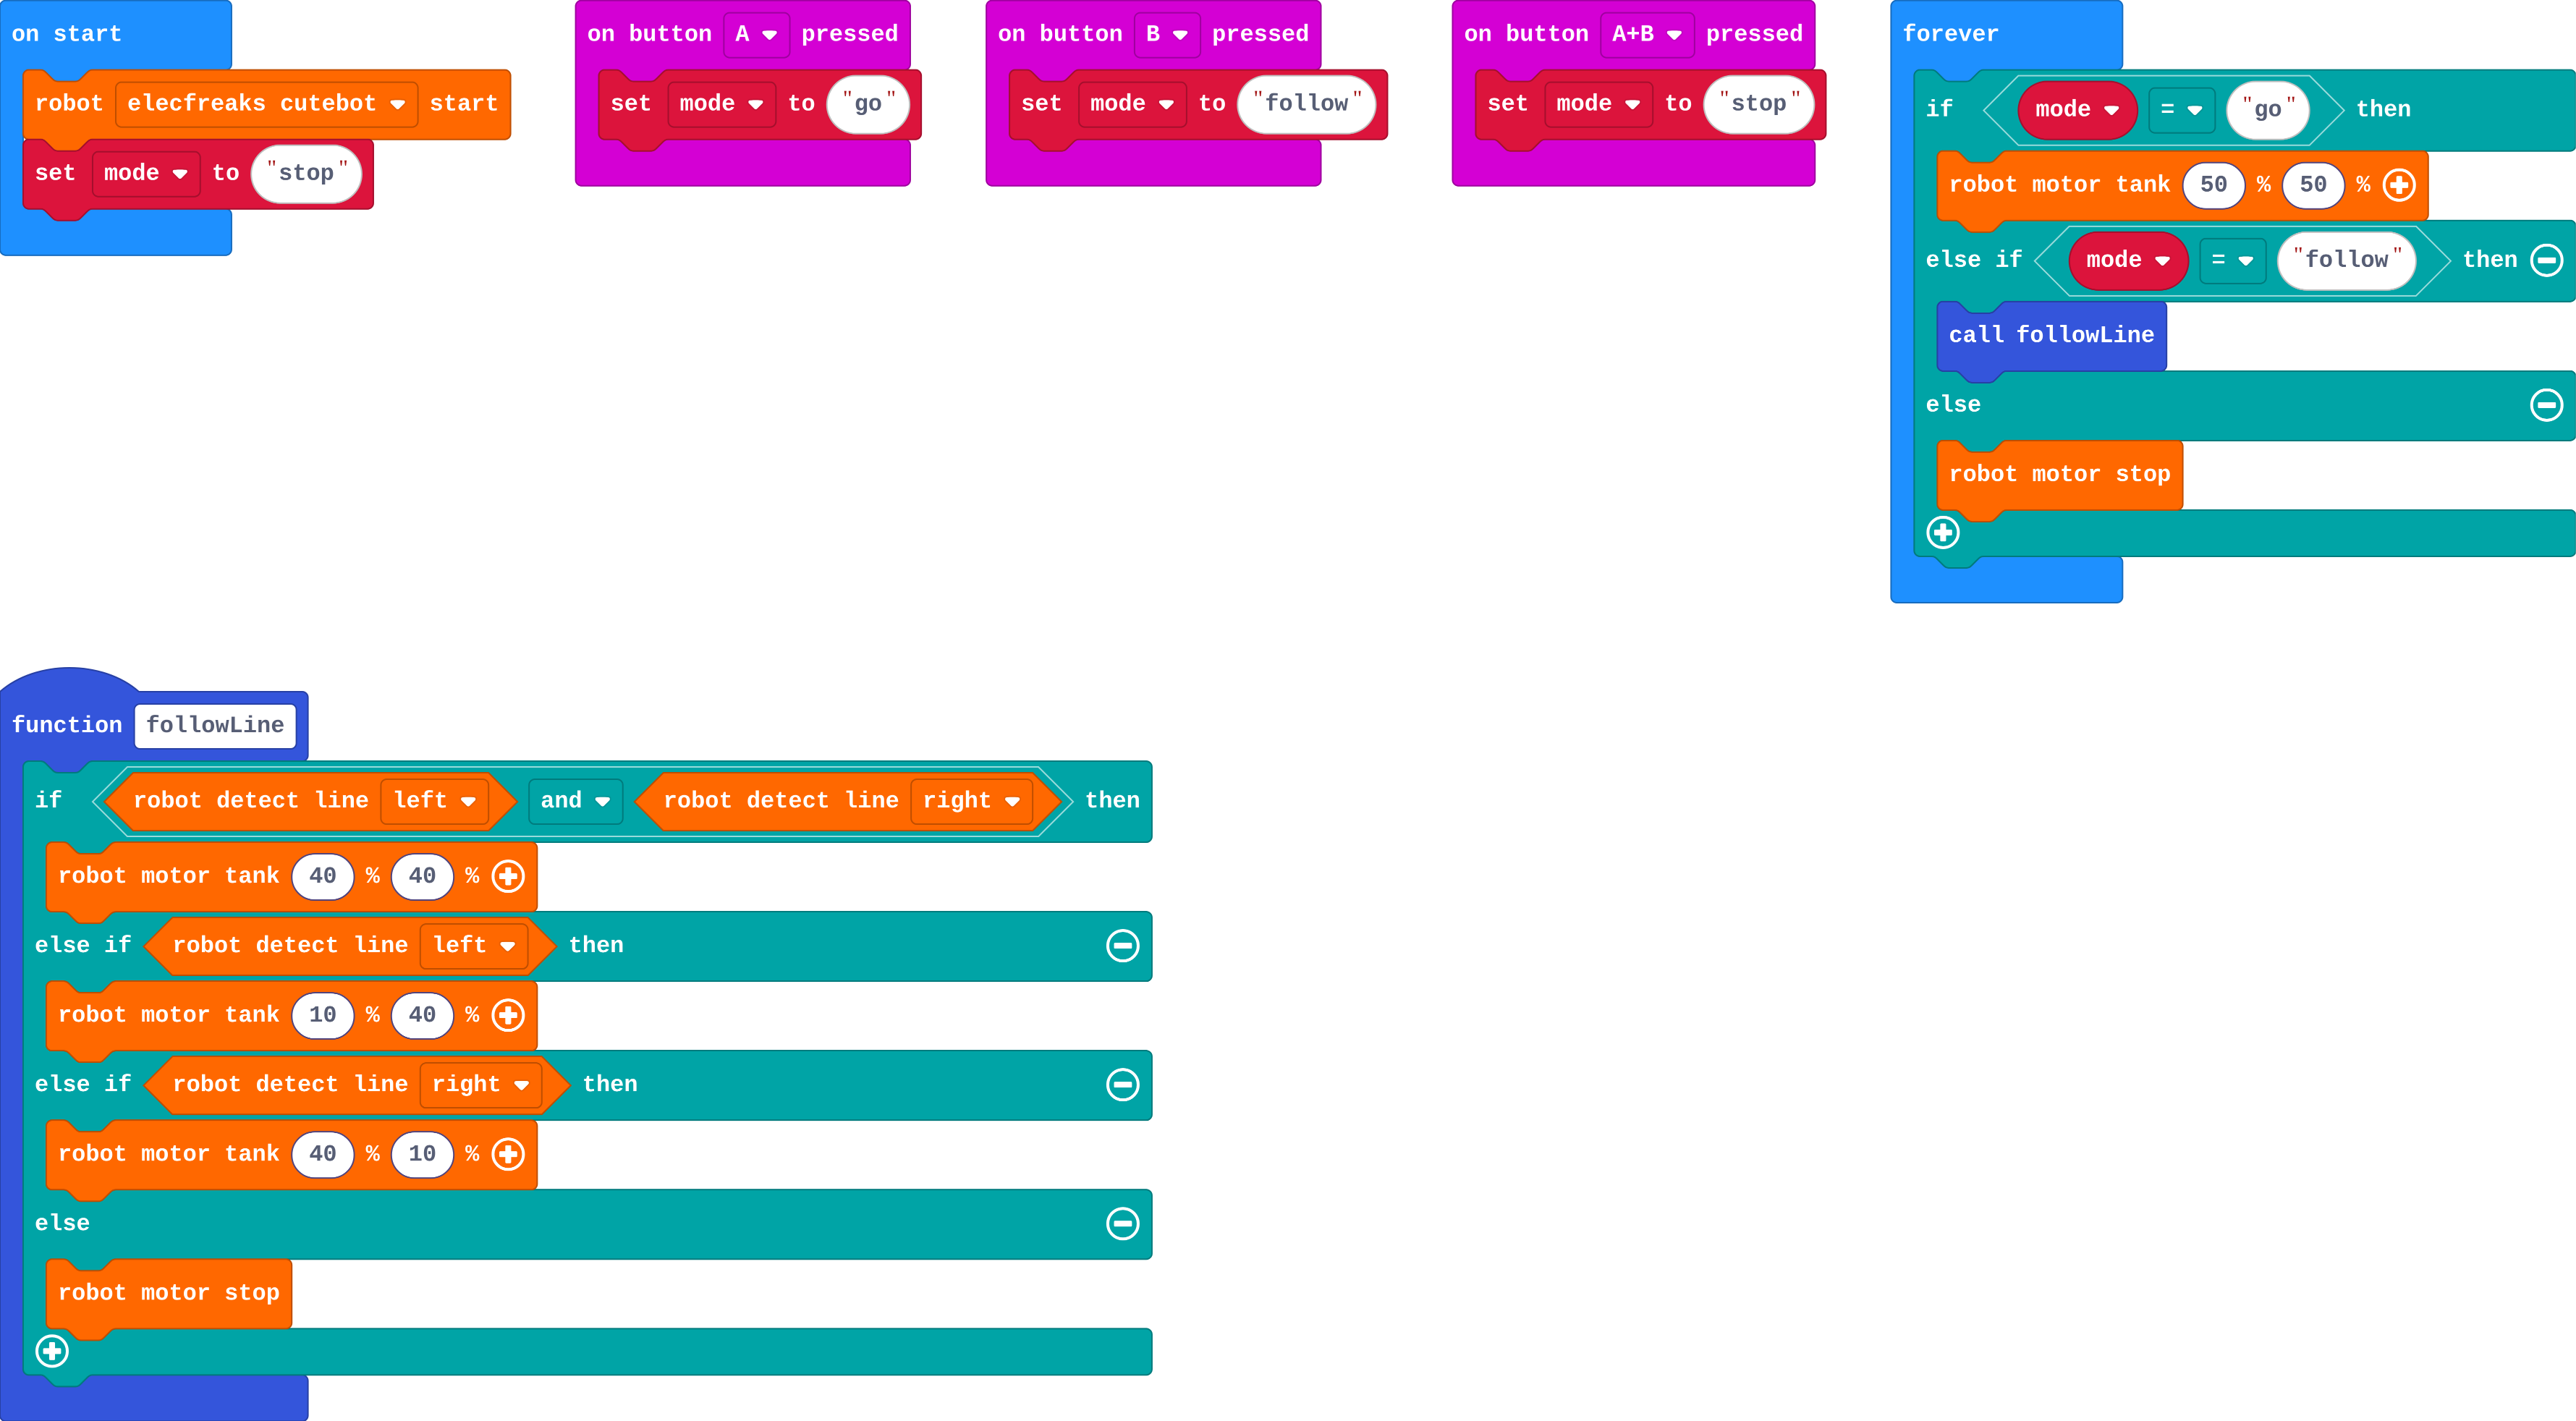
**The robot is on the line. You press B, wait, then press A+B. What happens?**

- Nothing: buttons cannot change what forever does
- It follows the line only while you hold B
- It moves a little when you press B, then stops by itself
- It follows the line, then stops when you press A+B

<!-- Speaker note: What happens: It follows the line until you press A+B. B sets mode to follow, and forever keeps following while mode stays follow. A+B sets mode to stop. Take two or three predictions before anyone runs it. -->

<!-- Speaker note: Teacher: the key question is why the robot keeps following after the button is let go. -->

---

<span style="background:#dcfce7; color:#1a1a1a; border:1.5px solid #22c55e; padding:6px 18px; border-radius:8px; font-size:1em; font-weight:500;">✅ Check</span>

## What happened?

* It follows the line until you press A+B. B sets mode to follow, and forever keeps following while mode stays follow. A+B sets mode to stop.

<!-- Speaker note: Reveal after running. Ask who predicted it, and what made them think so. -->

---

<span style="background:#fef3c7; color:#1a1a1a; border:1.5px solid #f59e0b; padding:6px 18px; border-radius:8px; font-size:1em; font-weight:500;">✍️ Activity</span>

## Run it

Open the lesson at this step and try it together.

[studio.learningwaypoints.com/tutorials/code/robotics/robot-modes/?full=step-2#step-2](https://studio.learningwaypoints.com/tutorials/code/robotics/robot-modes/?full=step-2#step-2)

<!-- Speaker note: Drag the robot onto the line. Press **B** (follow), **A** (go straight) and **A+B** (stop) on the simulator's micro:bit, in any order. Students should be able to say: I pressed B, A and A+B, and watched the robot change jobs. -->

<!-- Speaker note: Teacher: drag the robot onto the line before pressing B. -->

---

<span style="background:#dbeafe; color:#1a1a1a; border:1.5px solid #3b82f6; padding:6px 18px; border-radius:8px; font-size:1em; font-weight:500;">💬 Discussion</span>

## Investigate

![h:360](https://studio.learningwaypoints.com/tutorials/_pictures/makecode/code/4d1bd8397ecb.png?v=f5f8fe0f3af2e31f)

<!-- Speaker note: What this step is for: A button only changes the mode. forever reads the mode every time round and does that job, so the robot keeps doing it until the mode changes. -->

<!-- Speaker note: Teacher: act it out. One student holds a card with the mode word; another (forever) keeps reading it and acting. A third presses buttons by changing the card. -->

---

<span style="background:#dcfce7; color:#1a1a1a; border:1.5px solid #22c55e; padding:6px 18px; border-radius:8px; font-size:1em; font-weight:500;">✅ Check</span>

## Still following

**You pressed B a while ago and let go. Why does the robot keep following the line?**

- mode still says follow, and forever checks it again every time round
- followLine runs forever by itself
- The robot remembers the line
- The button is still pressed inside the micro:bit

* Answer: mode still says follow, and forever checks it again every time round

<!-- Speaker note: Pressing B ran one block: set mode to follow. The variable keeps that value, so every time forever checks, it finds follow and calls followLine. -->

<style scoped>pre, marp-pre { font-size: 0.5em; line-height: 1.25; } section { font-size: 25px; }</style>

---

<span style="background:#dcfce7; color:#1a1a1a; border:1.5px solid #22c55e; padding:6px 18px; border-radius:8px; font-size:1em; font-weight:500;">✅ Check</span>

## Ruby's robot

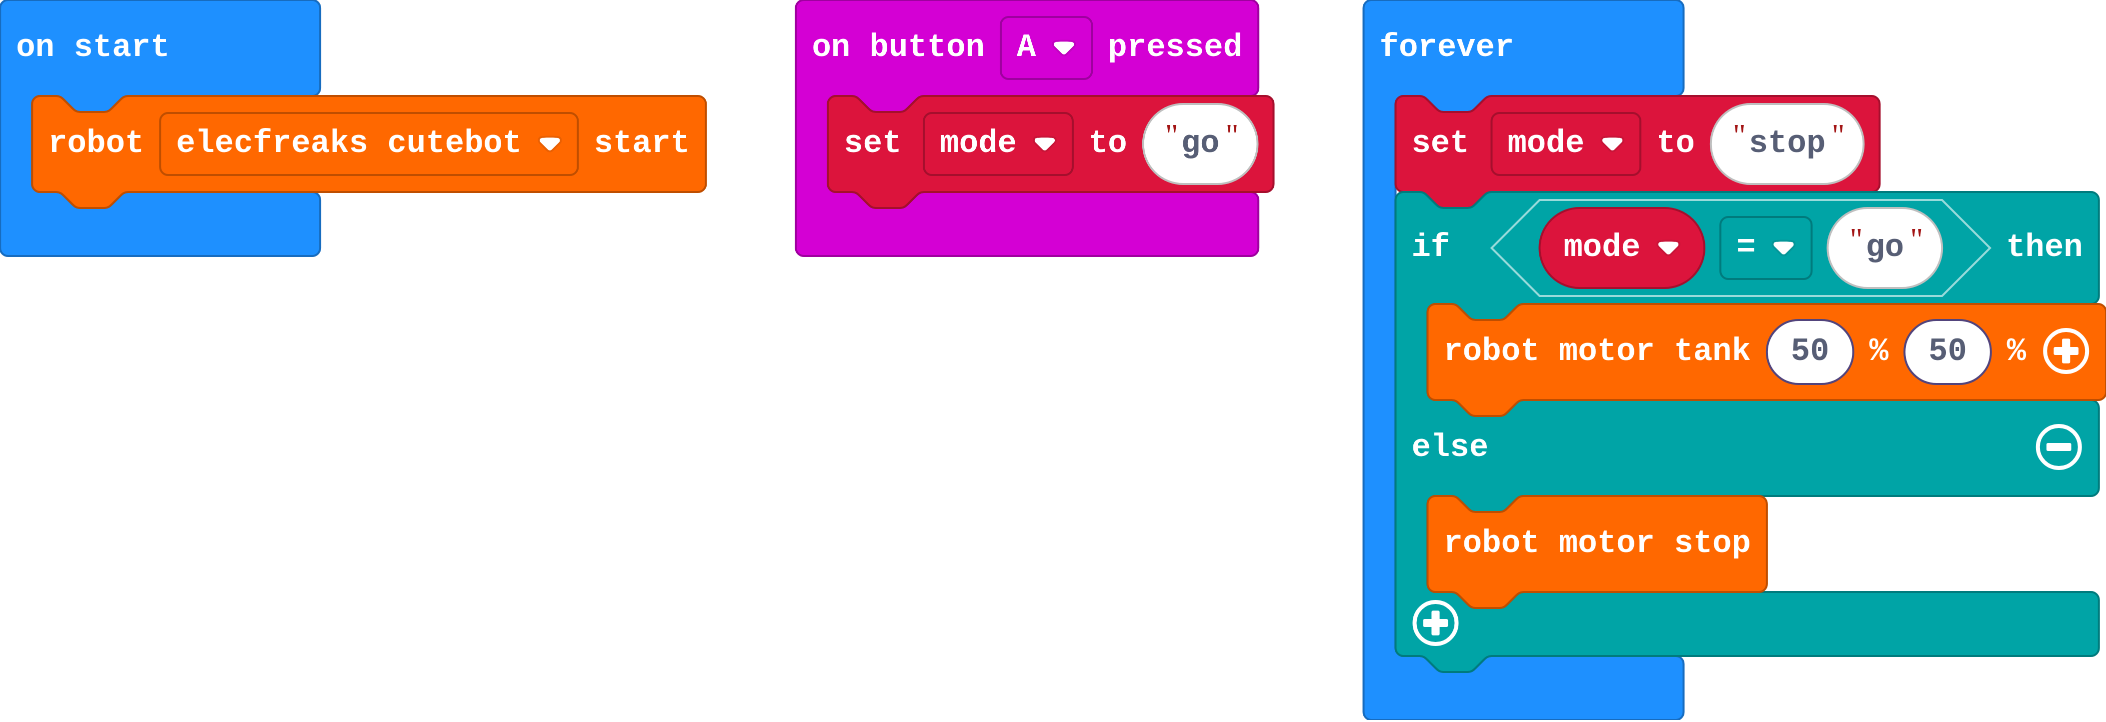
Ruby's program:

![h:360](https://studio.learningwaypoints.com/tutorials/_pictures/makecode/code/0c635b01a591.png?v=24e98be13021427a)

**Ruby's robot never moves, even when she presses A. Which part is wrong?**

- She needs else if
- Her A button sets the wrong mode
- forever sets mode to stop every time round, wiping out the A press straight away
- robot motor tank needs a time

* Answer: forever sets mode to stop every time round, wiping out the A press straight away

<!-- Speaker note: Setting mode to stop belongs in on start, once. Inside forever, it runs again every time round, so mode is stop again before the robot can move. -->

<style scoped>pre, marp-pre { font-size: 0.5em; line-height: 1.25; } section { font-size: 21px; }</style>

---

<span style="background:#fef3c7; color:#1a1a1a; border:1.5px solid #f59e0b; padding:6px 18px; border-radius:8px; font-size:1em; font-weight:500;">✍️ Activity</span>

## Modify


- **Which mode?:** A person needs to know which job the robot is doing. Show a **different picture** on the micro:bit for each mode, when its button is pressed.
- **Explore mode:** Add a fourth job: **explore**, chosen by touching the **logo**. In explore mode the robot drives and turns away from boxes, like lesson 4.

[Open this step](https://studio.learningwaypoints.com/tutorials/code/robotics/robot-modes/?full=step-4#step-4)

<!-- Speaker note: What this step is for: Adding a job means a new mode name, something that sets it, and a branch in forever that does it. Hints, in order: In each button event, under set mode, add a picture. / show arrow north for go, show icon diamond for follow, show icon square for stop. / on logo pressed is in Input. Inside it: set mode to explore. / In forever, click + on the if to add an else if: mode = explore. Inside it, put lesson 4's turn-away if … else. For students who need more support: Give the guard branch's else if with its question; students add the stop, the distance if and the lights. For early finishers: Make one button cycle through the modes: A sets mode to the next one in a list (go, follow, explore, stop). Or count how many times guard mode was triggered. The hard part, on purpose: Buttons only change the mode; forever does the job. When a mode never runs, ask them to compare the word in the button with the word in forever. When students get stuck: Pressing a button does nothing. Ask: Is set mode inside forever as well as in the button? Fix: Set the starting mode once, in on start. Only buttons change it after that. / The new mode never runs. Ask: Is the word in the button exactly the same as the word in forever? Fix: Spell it the same way in both places (explore, not Explore). / Guard mode beeps all the time. Ask: Is anything within 20 cm? Is the tone inside the if? Fix: Move the box away; keep the tone inside the if. -->

<!-- Speaker note: Teacher: a new mode needs three things: a name, something that sets it, and a branch in forever. Write the three on the board. -->

---

<span style="background:#fef3c7; color:#1a1a1a; border:1.5px solid #f59e0b; padding:6px 18px; border-radius:8px; font-size:1em; font-weight:500;">✍️ Activity</span>

## Make

Add a **guard** mode, like a security robot watching a doorway:

- shake the micro:bit to choose guard
- in guard mode the robot stays **still**
- when something comes closer than **20 cm**, it shows **red** lights and **beeps**; otherwise its lights are off

Drag a box towards the robot to test it.

[Open this step](https://studio.learningwaypoints.com/tutorials/code/robotics/robot-modes/?full=step-5#step-5)

<!-- Speaker note: Hints, in order: on shake (Input) sets mode to guard. In forever, add an else if for guard. / Inside guard: robot motor stop, then an if: distance < 20 → red lights and a tone (robot play tone); else lights off (black). -->

<!-- Speaker note: Teacher: guard mode reuses lesson 3's distance question. robot play tone is in Robot. -->

---

## On a real robot

The same program runs on a real robot. Things to notice:

- A real robot moves as soon as you press a button, so put it on the floor first, or press A+B before you pick it up.
- Pressing A and B together needs both at once; real buttons make it easy to press one a moment early. That is a reason real robots often use one button to **cycle** through modes instead.

---

<span style="background:#dcfce7; color:#1a1a1a; border:1.5px solid #22c55e; padding:6px 18px; border-radius:8px; font-size:1em; font-weight:500;">✅ Check</span>

## Exit ticket

**Why does the robot keep following the line after you let go of B?**

* B set the mode variable to follow. The variable keeps that value, and forever checks it every time round, so it keeps calling followLine.

<!-- Speaker note: Students answer on paper or a mini whiteboard before the reveal. Anyone who cannot answer needs the main idea again next lesson. Where this leads: Next unit: Talk. The buttons move to a second micro:bit, which becomes a remote control. Real-world links: lawn-mower and vacuum modes, a lift's modes (going up, going down, doors open), traffic lights. -->