---
marp: true
theme: default
html: true
---

# Drive and stop

Robotics challenges · Drive

<!-- Speaker note: Students set each wheel's speed with robot motor tank, drive and turn for a time, and find that a timed move does not stop the motors by itself; they finish by driving a square. About 45 minutes (Predict and Run 8 min · Investigate 10 min · Modify 10 min · Make 12 min · Real robot 5 min (optional)). -->

---

## Today

**We are learning to** set the speed of each wheel, drive for a time, turn, and stop.

- I can set the left and right wheel speeds to drive, turn and curve.
- I can make a move last for a time, and stop the robot at the end.
- I can repeat a drive and a turn to make a shape.

<!-- Speaker note: Before class: The robot has two wheels, each with its own motor. **robot motor tank** sets the **left** and **right** speeds from −100 to 100: equal speeds drive straight, opposite speeds spin on the spot, and unequal speeds curve. The optional **for … ms** box is a **time**: the robot keeps that speed for that long, then the program moves on. The surprise in this lesson is that a time **does not stop the motors**: they keep doing what they were last told until another motor block changes them. So every program that should end needs **robot motor stop**. Every program starts with a block that picks the robot (**Elecfreaks Cutebot** here). Schools with another supported robot change only that block. Kitronik MOVE Motor is not yet supported by the robot extension: MOVE Motor classes can use the Kitronik blocks on the real robot (`move Forward at speed`, `spin Left at speed`, `stop`, each with a pause), with the same ideas. The simulator robot also smooths its speed, so starts and stops are gentle. Turns by time are not exact angles: students tune the turn time until a square looks square, which is what they will do on a real robot too. Teacher: Real robot (optional): expect drift. robot set motor drift corrects a robot that pulls to one side. -->

---

## Why it matters

> A parade float, a warehouse trolley and a robot lawn mower all start the same way: two wheels, each told how fast to turn, and for how long.

<!-- Speaker note: This robot has **two wheels**, one on each side, each with its own motor. In blocks, **robot motor tank** sets the speed of the **left** and **right** wheel, from −100 (full speed backwards) to 100 (full speed forwards). You find it in **Robot**. Every robot program starts with a block that picks the robot: here, an **Elecfreaks Cutebot**. -->

---

<span style="background:#dbeafe; color:#1a1a1a; border:1.5px solid #3b82f6; padding:6px 18px; border-radius:8px; font-size:1em; font-weight:500;">💬 Discussion</span>

## Predict

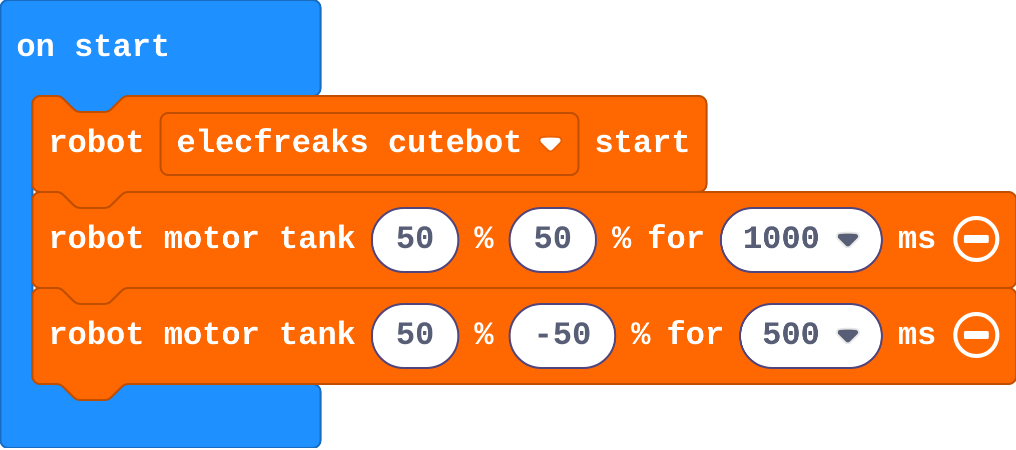
![h:224](https://studio.learningwaypoints.com/tutorials/_pictures/makecode/code/91165a52e362.png?v=6e688e3dacdf203a)

**The robot drives forward for 1 second, then turns for half a second. What happens next?**

- It drives forward again
- It turns back the way it came
- It stops: the program has finished
- It keeps spinning: nothing told the motors to stop

<!-- Speaker note: What happens: It keeps spinning. 'for 500 ms' means wait half a second before the next block, not stop. With no next block, the motors keep going as they were. Take two or three predictions before anyone runs it. -->

<!-- Speaker note: Teacher: most expect it to stop. Ask: which block told it to stop? -->

---

<span style="background:#dcfce7; color:#1a1a1a; border:1.5px solid #22c55e; padding:6px 18px; border-radius:8px; font-size:1em; font-weight:500;">✅ Check</span>

## What happened?

* It keeps spinning. 'for 500 ms' means wait half a second before the next block, not stop. With no next block, the motors keep going as they were.

<!-- Speaker note: Reveal after running. Ask who predicted it, and what made them think so. -->

---

<span style="background:#fef3c7; color:#1a1a1a; border:1.5px solid #f59e0b; padding:6px 18px; border-radius:8px; font-size:1em; font-weight:500;">✍️ Activity</span>

## Run it

Open the lesson at this step and try it together.

[studio.learningwaypoints.com/tutorials/code/robotics/robot-drive/?full=step-2#step-2](https://studio.learningwaypoints.com/tutorials/code/robotics/robot-drive/?full=step-2#step-2)

<!-- Speaker note: Watch the robot in the simulator. If it drives off the edge or into a box, drag it back to the middle and restart the simulator. Students should be able to say: I watched what the robot did after the turn, and compared it with my prediction. -->

<!-- Speaker note: Teacher: if it disappears off the edge, drag it back and restart the simulator. -->

---

<span style="background:#dbeafe; color:#1a1a1a; border:1.5px solid #3b82f6; padding:6px 18px; border-radius:8px; font-size:1em; font-weight:500;">💬 Discussion</span>

## Investigate

![h:272](https://studio.learningwaypoints.com/tutorials/_pictures/makecode/code/66f0bf8a628e.png?v=8f9d82e42e0ee072)

<!-- Speaker note: This version adds **robot motor stop** at the end, so the robot stops after its turn. What this step is for: A motor keeps doing what it was last told. A time on a motor block only says when to move on to the next block, so a robot needs a stop. -->

<!-- Speaker note: Teacher: let students test the match pairs in the simulator. Ava's robot is the lesson's key idea: a time is not a stop. -->

---

<span style="background:#dcfce7; color:#1a1a1a; border:1.5px solid #22c55e; padding:6px 18px; border-radius:8px; font-size:1em; font-weight:500;">✅ Check</span>

## Which way?

**Match each pair of wheel speeds with what the robot does.**

| | |
|---|---|
| `left 50, right 50` | A. spins on the spot, to the right |
| `left 50, right −50` | B. drives straight backwards |
| `left 50, right 20` | C. curves gently to the right |
| `left −50, right −50` | D. drives straight ahead |

* Answer: left 50, right 50 → D. drives straight ahead; left 50, right −50 → A. spins on the spot, to the right; left 50, right 20 → C. curves gently to the right; left −50, right −50 → B. drives straight backwards

<!-- Speaker note:  -->

<style scoped>pre, marp-pre { font-size: 0.5em; line-height: 1.25; } section { font-size: 23px; }</style>

---

<span style="background:#dcfce7; color:#1a1a1a; border:1.5px solid #22c55e; padding:6px 18px; border-radius:8px; font-size:1em; font-weight:500;">✅ Check</span>

## Ava's robot

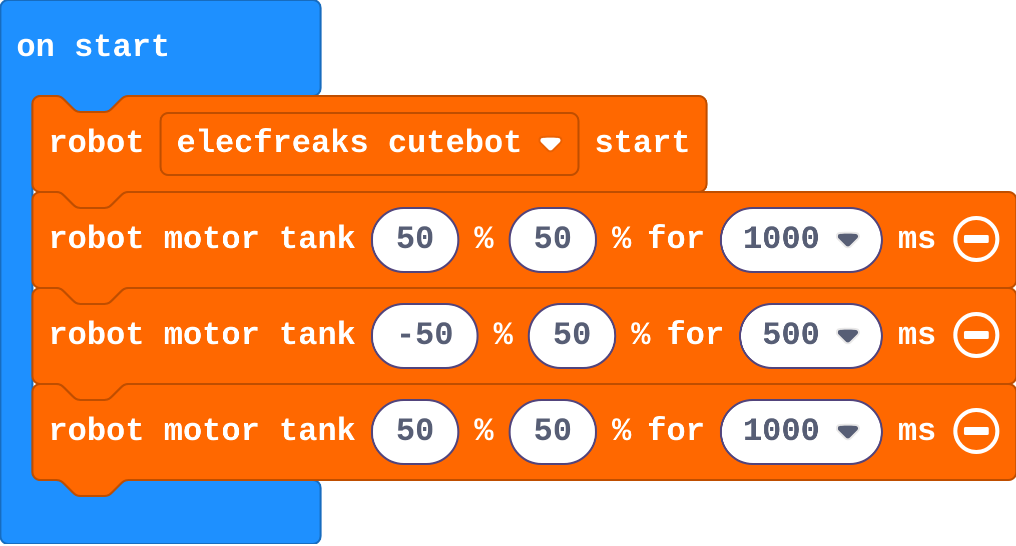
Ava's program:

![h:272](https://studio.learningwaypoints.com/tutorials/_pictures/makecode/code/83841ba6a3b1.png?v=aa33366f65c0b66f)

**Ava wants her robot to drive, turn, drive again, and then stop. Her robot never stops. Why?**

- 1000 ms is too long
- Her last move has a time, but a time does not stop the motors: she needs robot motor stop at the end
- She needs a forever block
- Her turn is the wrong way

* Answer: Her last move has a time, but a time does not stop the motors: she needs robot motor stop at the end

<!-- Speaker note: The time on her last block only says when to move on. There is nothing after it, so the motors keep going. robot motor stop at the end fixes it. -->

<style scoped>pre, marp-pre { font-size: 0.5em; line-height: 1.25; } section { font-size: 21px; }</style>

---

<span style="background:#fef3c7; color:#1a1a1a; border:1.5px solid #f59e0b; padding:6px 18px; border-radius:8px; font-size:1em; font-weight:500;">✍️ Activity</span>

## Modify


- **Back it up:** After the turn, make the robot drive **backwards** for one second before it stops.
- **Curve:** Add a gentle curve before the stop: left wheel **50**, right wheel **20**, for **2 seconds**. Which way does it curve?

[Open this step](https://studio.learningwaypoints.com/tutorials/code/robotics/robot-drive/?full=step-4#step-4)

<!-- Speaker note: What this step is for: Changing the two speeds changes the move; the time changes how far it goes. Hints, in order: Add another robot motor tank before robot motor stop. / Make both speeds −50. Click the + on the block to add a time, and set it to 1000 ms. / Add a robot motor tank before robot motor stop. / Left 50, right 20, for 2000 ms. For students who need more support: Give the square's repeat block with one drive inside; students add the turn and the stop. For early finishers: Drive a triangle (three sides, a bigger turn) and a figure of eight (two curves, one each way). The hard part, on purpose: A time on a motor block is not a stop. When the robot keeps spinning, ask what the last block tells the motors. When students get stuck: The robot keeps spinning after the program. Ask: What is the last block? Does it stop the motors? Fix: Add robot motor stop at the end. / The robot does not move at all. Ask: Is the first block robot … start? Are the speeds above 0? Fix: Keep the start block at the top, and use speeds like 50. / The square's corners are too sharp or too wide. Ask: Which number decides how far it turns? Fix: Change the turn's time, a little at a time. -->

<!-- Speaker note: Teacher: −50 −50 drives backwards. The curve goes right because the right wheel is slower. -->

---

<span style="background:#fef3c7; color:#1a1a1a; border:1.5px solid #f59e0b; padding:6px 18px; border-radius:8px; font-size:1em; font-weight:500;">✍️ Activity</span>

## Make

Make the robot drive a **square**, like a delivery trolley going round the four sides of a room:

- inside a **repeat 4 times**: drive forward, then turn
- after the repeat: stop

The turn's time decides the angle. Start with **400 ms** and change it until the corners look square.

[Open this step](https://studio.learningwaypoints.com/tutorials/code/robotics/robot-drive/?full=step-5#step-5)

<!-- Speaker note: Hints, in order: repeat is in Loops. Put one drive and one turn inside it, and set it to 4. / Drive with 50 50 for 1000 ms; turn with 50 −50. Change the turn's time until each corner looks square. Put robot motor stop after the repeat. -->

<!-- Speaker note: Teacher: repeat is in Loops. The turn time for a right angle depends on speed; about 400 ms at 50 is a starting point, then tune. -->

---

## On a real robot

The square program runs on a real Cutebot too. Put it on the floor with room to move. Things to notice:

- **It will not be a perfect square.** One motor is always a little stronger, so the robot drifts. The **robot set motor drift** block corrects it.
- **The turn time changes with the floor** and the batteries. Tune it again on the real robot.
- Real robots without wheel sensors cannot measure angles, which is why we turn **for a time**.

---

<span style="background:#dcfce7; color:#1a1a1a; border:1.5px solid #22c55e; padding:6px 18px; border-radius:8px; font-size:1em; font-weight:500;">✅ Check</span>

## Exit ticket

**Why does a robot keep moving after its last 'for 500 ms' block?**

* The time only says when to move on to the next block. The motors keep their last speed until a block such as robot motor stop changes them.

<!-- Speaker note: Students answer on paper or a mini whiteboard before the reveal. Anyone who cannot answer needs the main idea again next lesson. Where this leads: Next: give each move a name with functions, and build a dance routine. Class ideas: tape a square on the floor and see whose real robot finishes closest to its start. -->