---
marp: true
theme: default
html: true
---

# Sensors are numbers

micro:bit Foundations · Remember and sense

<!-- Speaker note: Students read light, temperature and tilt as numbers, and see that a sensor read in forever follows the world while one read in on start gives a single moment. About 40 minutes (Predict and Run 8 min · Investigate 10 min · Modify 8 min · Mix it up 3 min · Make 7 min · Light meter 4 min). -->

---

## Today

**We are learning to** read light, temperature and tilt as numbers, and show them.

- I can read a sensor and show its number.
- I can say what the light, temperature and tilt numbers mean.
- I can make a sensor reading update by itself.

<!-- Speaker note: Before class: A **sensor** gives the program a number that the world keeps changing. In the simulator the controls appear only once a program uses a sensor: the light slider (sun), the temperature slider (thermometer), and tilt by moving the mouse over the micro:bit. The key idea is the forever loop from lesson 2: a sensor read in forever is read again and again; in on start, once. Teacher: Mix it up: a quick trace of set and change from last lesson. -->

---

## Why it matters

> A phone dims its screen in the dark and turns the picture when you tilt it. Inside, a sensor is just handing the phone a number.

<!-- Speaker note: The micro:bit has **sensors**: parts that measure the world around it, such as how bright it is or how warm. Each sensor gives the program a **number**. You find them in **Input**. In the simulator, sensors appear as controls when your program uses them: drag the **light** slider (the sun), drag the **temperature** slider (the thermometer), or move the mouse over the micro:bit to **tilt** it. -->

---

<span style="background:#dbeafe; color:#1a1a1a; border:1.5px solid #3b82f6; padding:6px 18px; border-radius:8px; font-size:1em; font-weight:500;">💬 Discussion</span>

## Predict

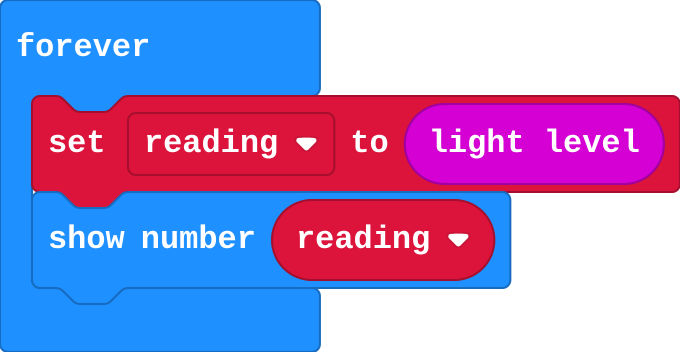
![h:128](https://studio.learningwaypoints.com/tutorials/_pictures/makecode/code/3999f89d7cc7.png?v=365f85d3d1627ab6)

**What will the micro:bit show?**

- The same number over and over, even when the light changes
- The word light
- 0, and nothing else
- A number that changes when the light changes

<!-- Speaker note: What happens: A number that changes with the light. forever reads the light level again each time round, so the number follows the slider. Take two or three predictions before anyone runs it. -->

<!-- Speaker note: Teacher: ask whether the number will follow the light. The key is that forever reads it again each time. Ask the 'same number over and over' group what forever does each time round. -->

---

<span style="background:#dcfce7; color:#1a1a1a; border:1.5px solid #22c55e; padding:6px 18px; border-radius:8px; font-size:1em; font-weight:500;">✅ Check</span>

## What happened?

* A number that changes with the light. forever reads the light level again each time round, so the number follows the slider.

<!-- Speaker note: Reveal after running. Ask who predicted it, and what made them think so. -->

---

<span style="background:#fef3c7; color:#1a1a1a; border:1.5px solid #f59e0b; padding:6px 18px; border-radius:8px; font-size:1em; font-weight:500;">✍️ Activity</span>

## Run it

Open the lesson at this step and try it together.

[studio.learningwaypoints.com/tutorials/code/microbit/microbit-sensors/?full=step-2#step-2](https://studio.learningwaypoints.com/tutorials/code/microbit/microbit-sensors/?full=step-2#step-2)

<!-- Speaker note: Drag the light slider (the sun on the simulator) up and down. Try the darkest and brightest settings. Students should be able to say: I dragged the light slider and watched the number change. -->

<!-- Speaker note: Teacher: drag the light slider from dark to bright. The number lags a little because it scrolls. -->

---

<span style="background:#dbeafe; color:#1a1a1a; border:1.5px solid #3b82f6; padding:6px 18px; border-radius:8px; font-size:1em; font-weight:500;">💬 Discussion</span>

## Investigate

![h:176](https://studio.learningwaypoints.com/tutorials/_pictures/makecode/code/1cf85b412f0a.png?v=096a59de64ff0deb)

<!-- Speaker note: This program keeps each reading in a variable called `reading`, then shows it. The world changes the light; forever reads it again and again. What this step is for: A sensor is a number the world keeps changing. Reading it once gives one moment; reading it in forever follows it. -->

<!-- Speaker note: Teacher: Sam's thermometer is lesson 2's on start mistake again, in a new place. Ask the class which lesson it reminds them of. -->

---

<span style="background:#dcfce7; color:#1a1a1a; border:1.5px solid #22c55e; padding:6px 18px; border-radius:8px; font-size:1em; font-weight:500;">✅ Check</span>

## What do they measure?

**Match each sensor with what its number means.**

| | |
|---|---|
| `light level` | A. how far it tilts left (below 0) or right (above 0) |
| `temperature` | B. how warm it is, in degrees Celsius |
| `acceleration x` | C. how bright it is, from 0 (dark) to 255 (bright) |

* Answer: light level → C. how bright it is, from 0 (dark) to 255 (bright); temperature → B. how warm it is, in degrees Celsius; acceleration x → A. how far it tilts left (below 0) or right (above 0)

<!-- Speaker note:  -->

<style scoped>pre, marp-pre { font-size: 0.5em; line-height: 1.25; } section { font-size: 21px; }</style>

---

<span style="background:#dcfce7; color:#1a1a1a; border:1.5px solid #22c55e; padding:6px 18px; border-radius:8px; font-size:1em; font-weight:500;">✅ Check</span>

## How bright?

**Drag the light slider all the way up. What is the biggest number the light level can be?**

* Answer: 255

<!-- Speaker note: Light level runs from 0 (dark) to 255 (as bright as it can measure). -->

---

<span style="background:#dcfce7; color:#1a1a1a; border:1.5px solid #22c55e; padding:6px 18px; border-radius:8px; font-size:1em; font-weight:500;">✅ Check</span>

## Sam's thermometer

Sam's program:

![h:128](https://studio.learningwaypoints.com/tutorials/_pictures/makecode/code/7eb0d60bd9c6.png?v=57cb97115d035648)

**Sam's program shows the temperature. He drags the temperature slider, but the number never changes. Why?**

- The block is in on start, so it reads the temperature once
- The temperature sensor is broken
- Temperature only works on a real micro:bit
- He needs a variable

* Answer: The block is in on start, so it reads the temperature once

<!-- Speaker note: on start runs once, so Sam's program reads the temperature at the very start and never again. In forever, it would read it again each time round. -->

<style scoped>pre, marp-pre { font-size: 0.5em; line-height: 1.25; } section { font-size: 22px; }</style>

---

<span style="background:#fef3c7; color:#1a1a1a; border:1.5px solid #f59e0b; padding:6px 18px; border-radius:8px; font-size:1em; font-weight:500;">✍️ Activity</span>

## Read the room <span style="font-size:.6em;color:#64748b">(4 min)</span>

One student reads a thermometer (or looks out of the window) and calls out what they see, again and again. A second student calls out only once, at the start.

<!-- Speaker note: Who still knows what the room is like after five minutes? That is forever against on start. -->

---

<span style="background:#fef3c7; color:#1a1a1a; border:1.5px solid #f59e0b; padding:6px 18px; border-radius:8px; font-size:1em; font-weight:500;">✍️ Activity</span>

## Modify


- **Swap the sensor:** Show the temperature instead of the light level. Drag the temperature slider to test it.
- **Read on request:** Read a sensor only when asked: **A** shows the light level, **B** shows the temperature.

[Open this step](https://studio.learningwaypoints.com/tutorials/code/microbit/microbit-sensors/?full=step-4#step-4)

<!-- Speaker note: What this step is for: Any sensor block fits wherever a number fits, and an event decides when it is read. Hints, in order: temperature is in Input. Drag it into show number, in place of light level. / Use on button A pressed and on button B pressed from Input. / Put show number inside each one, with a different sensor in each. For students who need more support: Give students the thermometer's forever block with show number already in it, and ask them to add the C and the pause. For early finishers: Show tilt as a number with acceleration x, then make A show tilt left and right and B show tilt forward and back (acceleration y). The hard part, on purpose: A sensor is read once in on start and many times in forever. When the number never changes, ask where the sensor block is. When students get stuck: The number never changes. Ask: Is the sensor block in on start or in forever? Fix: Move it into forever (or a button event) so it is read again. / The simulator has no slider. Ask: Has the program got a sensor block in it, and is it running? Fix: The slider appears only after a sensor block is used. Restart the simulator if needed. / The temperature seems too high on a real micro:bit. Ask: Where is the sensor? Fix: It is in the processor, which warms up as it works. It reads a little above the room. -->

<!-- Speaker note: Teacher: Read on request shows that an event decides when a sensor is read. -->

---

<span style="background:#dbeafe; color:#1a1a1a; border:1.5px solid #3b82f6; padding:6px 18px; border-radius:8px; font-size:1em; font-weight:500;">💬 Discussion</span>

## Investigate: Mix it up

![h:176](https://studio.learningwaypoints.com/tutorials/_pictures/makecode/code/930796d83b92.png?v=63fc9ba6b315c353)

<!-- Speaker note: A points counter, no sensors in sight. What this step is for: change adds to what is there; set throws it away. -->

---

<span style="background:#dcfce7; color:#1a1a1a; border:1.5px solid #22c55e; padding:6px 18px; border-radius:8px; font-size:1em; font-weight:500;">✅ Check</span>

## Mix it up

**A changes points by 2 and B sets it to 0. Fill in points after each press.**

| press | points after |
|---|---|
| (start) | 0 |
| A | ? |
| A | ? |
| B | ? |
| A | ? |

* Answer: 2, 4, 0, 2

<!-- Speaker note: Each A adds 2 to whatever points is now. B throws the value away and puts 0 there. What this step is for: change adds to what is there; set throws it away. -->

<style scoped>pre, marp-pre { font-size: 0.5em; line-height: 1.25; } section { font-size: 22px; }</style>

---

<span style="background:#fef3c7; color:#1a1a1a; border:1.5px solid #f59e0b; padding:6px 18px; border-radius:8px; font-size:1em; font-weight:500;">✍️ Activity</span>

## Make

Make a **thermometer**. Again and again, it shows the temperature, then the letter **C** (for Celsius), then waits two seconds.

[Open this step](https://studio.learningwaypoints.com/tutorials/code/microbit/microbit-sensors/?full=step-6#step-6)

<!-- Speaker note: Hints, in order: Inside forever: show the temperature, then show the letter C, then pause. / show string is in Basic. Type C into it. 2000 ms is two seconds. -->

<!-- Speaker note: Teacher: temperature, C, pause: three blocks in forever. -->

---

<span style="background:#fef3c7; color:#1a1a1a; border:1.5px solid #f59e0b; padding:6px 18px; border-radius:8px; font-size:1em; font-weight:500;">✍️ Activity</span>

## Change a light meter

This light meter draws a bar instead of a number: the brighter it is, the more LEDs light up. **plot bar graph** needs the biggest value the sensor can give (255 for light). Change it into a **temperature** meter, where 40 is the biggest value.

[Open this step](https://studio.learningwaypoints.com/tutorials/code/microbit/microbit-sensors/?full=step-7#step-7)

---

<span style="background:#dcfce7; color:#1a1a1a; border:1.5px solid #22c55e; padding:6px 18px; border-radius:8px; font-size:1em; font-weight:500;">✅ Check</span>

## Exit ticket

**Why does reading the temperature in on start not work for a thermometer?**

* on start reads it once, at the start. A thermometer must read it again and again, in forever.

<!-- Speaker note: Students answer on paper or a mini whiteboard before the reveal. Anyone who cannot answer needs the main idea again next lesson. Where this leads: Next unit: the micro:bit decides what to do using these numbers (if it is dark, light up). Class ideas: measure the brightest and darkest spots in the room with real micro:bits; record the temperature by a window every lesson for a week. -->