---
marp: true
theme: default
html: true
---

# Wait for a press

micro:bit Foundations · Show and react

<!-- Speaker note: Students make programs that wait for a button press or a shake, and see that an event block runs its blocks every time its event happens, and only then. About 45 minutes (Predict and Run 10 min · Investigate 10 min · Modify 8 min · Mix it up 3 min · Make 10 min · Indicator 4 min). -->

---

## Today

**We are learning to** make the micro:bit wait for a button press or a shake, then react.

- I can make the micro:bit react when a button is pressed or it is shaken.
- I can say when on start, forever and an event block each run.
- I can add a new event block to react to something new.

<!-- Speaker note: Before class: An **event** is something that happens: a button press, a shake. An **event block** (such as *on button A pressed*) holds blocks that run **every time** that event happens, and only then. Compare with the last two lessons: **on start** runs once, **forever** runs again and again by itself. In the simulator, students click the A and B buttons, and click **SHAKE** for a shake. Try the Make yourself: four event blocks, one picture in each. Teacher: Mix it up: a quick look back at forever and pause. -->

---

## Why it matters

> A doorbell, a game controller, a TV remote: each one waits for a press, then does one job.

<!-- Speaker note: So far the micro:bit ran its blocks and carried on by itself. Most devices **wait** instead: nothing happens until you press something. A block that waits like this is called an **event** block. You find them in **Input**. In the simulator, click the **A** and **B** buttons with the mouse. To shake, click **SHAKE** above the micro:bit. -->

---

<span style="background:#dbeafe; color:#1a1a1a; border:1.5px solid #3b82f6; padding:6px 18px; border-radius:8px; font-size:1em; font-weight:500;">💬 Discussion</span>

## Predict

![h:329](https://studio.learningwaypoints.com/tutorials/_pictures/makecode/code/ae562876db2f.png?v=1b0dee3e7ad62b74)

**What does the micro:bit show when it starts, and then after you press B?**

- Asleep, then sad when B is pressed
- Nothing until a button is pressed
- Happy, then sad, straight away when it starts
- Asleep, then happy and sad together

<!-- Speaker note: What happens: It shows the asleep face at the start, then waits. Pressing B runs only the blocks inside 'on button B pressed', so the sad face shows. Take two or three predictions before anyone runs it. -->

<!-- Speaker note: Teacher: ask which blocks run straight away and which wait. Many students expect the faces to show at the start. -->

---

<span style="background:#dcfce7; color:#1a1a1a; border:1.5px solid #22c55e; padding:6px 18px; border-radius:8px; font-size:1em; font-weight:500;">✅ Check</span>

## What happened?

* It shows the asleep face at the start, then waits. Pressing B runs only the blocks inside 'on button B pressed', so the sad face shows.

<!-- Speaker note: Reveal after running. Ask who predicted it, and what made them think so. -->

---

<span style="background:#fef3c7; color:#1a1a1a; border:1.5px solid #f59e0b; padding:6px 18px; border-radius:8px; font-size:1em; font-weight:500;">✍️ Activity</span>

## Run it

Open the lesson at this step and try it together.

[studio.learningwaypoints.com/tutorials/code/microbit/microbit-buttons/?full=step-2#step-2](https://studio.learningwaypoints.com/tutorials/code/microbit/microbit-buttons/?full=step-2#step-2)

<!-- Speaker note: Press **A**, then **B**, then **A** again. Compare with your prediction. Students should be able to say: I pressed A and B in the simulator and compared what happened with my prediction. -->

<!-- Speaker note: Teacher: press A, B, A. Say it plainly: nothing happens until a button is pressed, and each press runs its own blocks. -->

---

<span style="background:#dbeafe; color:#1a1a1a; border:1.5px solid #3b82f6; padding:6px 18px; border-radius:8px; font-size:1em; font-weight:500;">💬 Discussion</span>

## Investigate

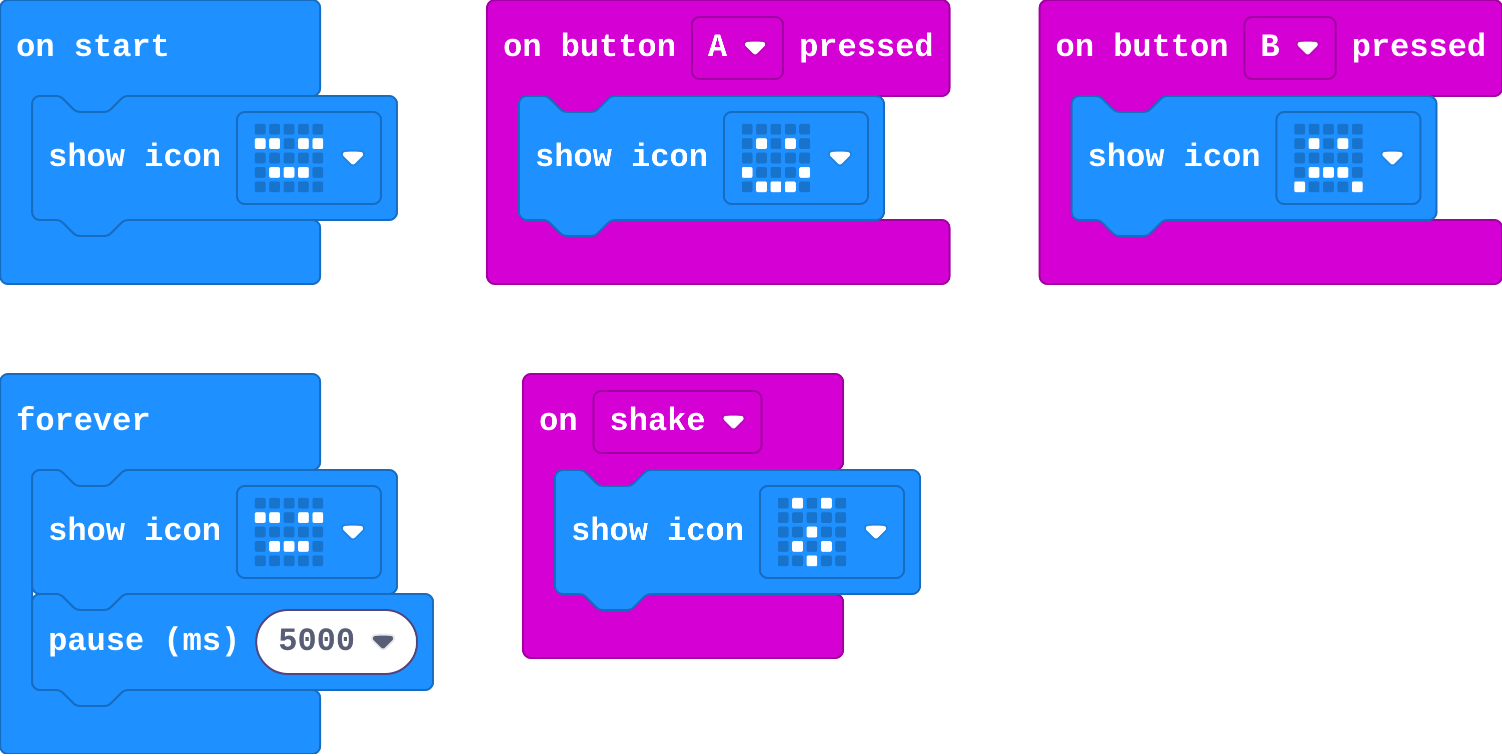
![h:360](https://studio.learningwaypoints.com/tutorials/_pictures/makecode/code/8959e874587e.png?v=7da8165414186f1a)

<!-- Speaker note: This program has four groups of blocks. Try it in your head first. What this step is for: An event block runs its blocks every time its event happens, and only then. on start and forever are not events you trigger: they run by themselves. -->

<!-- Speaker note: Teacher: the match task names when each kind of block runs. Ben's button is the classic mistake: a check in on start happens once, before anyone presses. -->

---

<span style="background:#dcfce7; color:#1a1a1a; border:1.5px solid #22c55e; padding:6px 18px; border-radius:8px; font-size:1em; font-weight:500;">✅ Check</span>

## When does it run?

**Match each block with when its blocks run.**

| | |
|---|---|
| `on start` | A. again and again, by itself |
| `forever` | B. each time the micro:bit is shaken |
| `on button A pressed` | C. each time A is pressed |
| `on shake` | D. once, when the micro:bit switches on |

* Answer: on start → D. once, when the micro:bit switches on; forever → A. again and again, by itself; on button A pressed → C. each time A is pressed; on shake → B. each time the micro:bit is shaken

<!-- Speaker note:  -->

<style scoped>pre, marp-pre { font-size: 0.5em; line-height: 1.25; } section { font-size: 20px; }</style>

---

<span style="background:#dcfce7; color:#1a1a1a; border:1.5px solid #22c55e; padding:6px 18px; border-radius:8px; font-size:1em; font-weight:500;">✅ Check</span>

## Count the presses

**You press A four times. How many times does the happy face appear?**

* Answer: 4

<!-- Speaker note: The blocks inside 'on button A pressed' run once for every press. -->

---

<span style="background:#dcfce7; color:#1a1a1a; border:1.5px solid #22c55e; padding:6px 18px; border-radius:8px; font-size:1em; font-weight:500;">✅ Check</span>

## Ben's button

Ben's program used an **if** block from Logic. Read this for now: it asks a yes-or-no question, *is A pressed right now?*, and runs the blocks inside only if the answer is yes. You will use **if** properly in a later lesson.

![h:222](https://studio.learningwaypoints.com/tutorials/_pictures/makecode/code/5f19ab5c2fb6.png?v=3de5bf0f36b8d7bf)

**Ben wants A to show a heart. He put this in on start. He presses A and nothing happens. Why?**

- He needs a pause first
- on start checks the button once, when the micro:bit switches on, before he presses it
- Hearts only work in forever
- A is broken in the simulator

* Answer: on start checks the button once, when the micro:bit switches on, before he presses it

<!-- Speaker note: on start runs once, at the very start. By the time Ben presses A, the check is long over. 'on button A pressed' waits for the press instead. -->

<style scoped>pre, marp-pre { font-size: 0.5em; line-height: 1.25; } section { font-size: 18px; }</style>

---

<span style="background:#fef3c7; color:#1a1a1a; border:1.5px solid #f59e0b; padding:6px 18px; border-radius:8px; font-size:1em; font-weight:500;">✍️ Activity</span>

## Human micro:bit <span style="font-size:.6em;color:#64748b">(4 min)</span>

One student is the micro:bit with a face card for each event. The class calls out "A", "B" or "shake"; the micro:bit shows only the card for that event.

<!-- Speaker note: When nobody calls anything, nothing happens. That is what waiting means. -->

---

<span style="background:#fef3c7; color:#1a1a1a; border:1.5px solid #f59e0b; padding:6px 18px; border-radius:8px; font-size:1em; font-weight:500;">✍️ Activity</span>

## Modify


- **Change the faces:** Choose different pictures for **A** and **B**.
- **Press both:** Add a third event block for **A+B** (both buttons at once). Make it show a picture of your choice.

[Open this step](https://studio.learningwaypoints.com/tutorials/code/microbit/microbit-buttons/?full=step-4#step-4)

<!-- Speaker note: What this step is for: To change what an event does, change the blocks inside it. To react to something new, add a new event block. Hints, in order: Click the picture in a show icon block to choose a different one. / 'on button A pressed' is in Input. Drag in another one. / Click the A in the new block and choose A+B. For students who need more support: Give students the four event blocks already placed and empty, and ask them only to fill in the pictures. For early finishers: Make the signal board flash each arrow three times, and have shake show a short animation of three frames. The hard part, on purpose: An event block runs only when its event happens. When a press does nothing, ask which block the picture is inside. When students get stuck: Pressing a button does nothing. Ask: Which block is your picture inside? Fix: Put it inside 'on button A pressed' (from Input), not in on start. / A+B never fires: A or B fires instead. Ask: Did you press both at once? Fix: In the simulator, click the A+B button below the micro:bit. On a real micro:bit, press both together. / Two event blocks for the same button, and only one seems to work. Ask: How many 'on button A pressed' blocks are there? Fix: Keep one block per event, and put everything for that press inside it. -->

<!-- Speaker note: Teacher: changing a face changes what an event does. Adding A+B is a new event block, not a change to an old one. -->

---

<span style="background:#dbeafe; color:#1a1a1a; border:1.5px solid #3b82f6; padding:6px 18px; border-radius:8px; font-size:1em; font-weight:500;">💬 Discussion</span>

## Investigate: Mix it up

![h:360](https://studio.learningwaypoints.com/tutorials/_pictures/makecode/code/00b21d278056.png?v=618b2949268e53db)

<!-- Speaker note: Read the animation from the top, the way forever goes round it. What this step is for: forever goes round its blocks in order, and each pause sets how long that picture stays. -->

---

<span style="background:#dcfce7; color:#1a1a1a; border:1.5px solid #22c55e; padding:6px 18px; border-radius:8px; font-size:1em; font-weight:500;">✅ Check</span>

## Mix it up

**This animation runs in forever. Which picture stays on the longest each time round?**

- The heart
- They all stay the same time
- The small heart
- The tick

* Answer: The tick

<!-- Speaker note: Each pause holds the picture just before it. The tick is followed by pause 1000, the longest pause, so it stays longest. What this step is for: forever goes round its blocks in order, and each pause sets how long that picture stays. -->

---

<span style="background:#fef3c7; color:#1a1a1a; border:1.5px solid #f59e0b; padding:6px 18px; border-radius:8px; font-size:1em; font-weight:500;">✍️ Activity</span>

## Make

Build a **signal board** for a bike rider:

- **A** shows an arrow pointing left.
- **B** shows an arrow pointing right.
- **A+B** shows a cross for "stop".
- **Shake** shows a surprised face.

[Open this step](https://studio.learningwaypoints.com/tutorials/code/microbit/microbit-buttons/?full=step-6#step-6)

<!-- Speaker note: Hints, in order: You need four event blocks: A, B, A+B and shake. Each one has one picture inside. / show arrow is in Basic (click more...). Choose the direction with the dropdown. -->

<!-- Speaker note: Teacher: four event blocks. show arrow is under Basic › more. -->

---

<span style="background:#fef3c7; color:#1a1a1a; border:1.5px solid #f59e0b; padding:6px 18px; border-radius:8px; font-size:1em; font-weight:500;">✍️ Activity</span>

## Change a bike indicator

Real bike indicators flash. This one flashes each arrow twice. Make it flash three times, then make **A+B** flash a warning (both arrows, or a picture you draw).

[Open this step](https://studio.learningwaypoints.com/tutorials/code/microbit/microbit-buttons/?full=step-7#step-7)

---

<span style="background:#dcfce7; color:#1a1a1a; border:1.5px solid #22c55e; padding:6px 18px; border-radius:8px; font-size:1em; font-weight:500;">✅ Check</span>

## Exit ticket

**Why does 'if button A is pressed' in on start not work, when 'on button A pressed' does?**

* on start checks once, when the micro:bit switches on, before anyone presses. The event block waits and runs every time A is pressed.

<!-- Speaker note: Students answer on paper or a mini whiteboard before the reveal. Anyone who cannot answer needs the main idea again next lesson. Where this leads: Next unit adds variables, so a button can count presses. Class ideas: a quiz buzzer where A and B are two teams. With real micro:bits: wear one on a bag strap as a bike signal. -->