---
marp: true
theme: default
html: true
---

# Send data to the computer

micro:bit and the computer · Talk over USB

<!-- Speaker note: Students make a micro:bit send sensor readings to the computer over USB as named lines of text, and watch them graphed. About 45 minutes (Predict and Run 8 min · On a real micro:bit 8 min (typical) · Investigate 8 min · Modify 10 min · Make 10 min). -->

---

## Today

**We are learning to** a micro:bit sends each sensor reading down the USB cable as a line of text, such as light:128. The computer turns the stream of lines into a graph.

- I can send a sensor reading to the computer again and again.
- I can explain what travels down the cable (a named line of text).
- I can send two values and choose how often they are sent.

<!-- Speaker note: Before class: **The idea:** a micro:bit plugged into a computer can send text down the USB cable, one line at a time (this is called **serial**). **serial write value** sends a line such as `light:128`: a name, a colon and a number. Whatever is on the other end (MakeCode's Show data, the board in this lesson, a spreadsheet) turns those lines into a table or a graph. **Without micro:bits:** the MakeCode simulator shows the values under **Show data**, so every required step works in the browser. The board step ("On a real micro:bit") is optional and needs a micro:bit, a data USB cable and **Chrome or Edge**. **With micro:bits:** students download the program, leave the micro:bit plugged in, and click **Connect a micro:bit** on the board. Only one page can use the cable at a time, so if MakeCode is connected to the micro:bit, disconnect it there first. Teacher: On a real micro:bit: covering it and shining a torch makes a clear graph. -->

---

## Why it matters

> Weather stations, heart-rate monitors and the sensors in a science lab all do the same simple thing: send a reading, wait, send the next. A computer collects the readings and draws the graph.

<!-- Speaker note: In micro:bit Foundations, everything you made stayed on the micro:bit. Now it talks to the computer it is plugged into. A cable that sends text one line at a time is called **serial**. -->

---

<span style="background:#dbeafe; color:#1a1a1a; border:1.5px solid #3b82f6; padding:6px 18px; border-radius:8px; font-size:1em; font-weight:500;">💬 Discussion</span>

## Predict

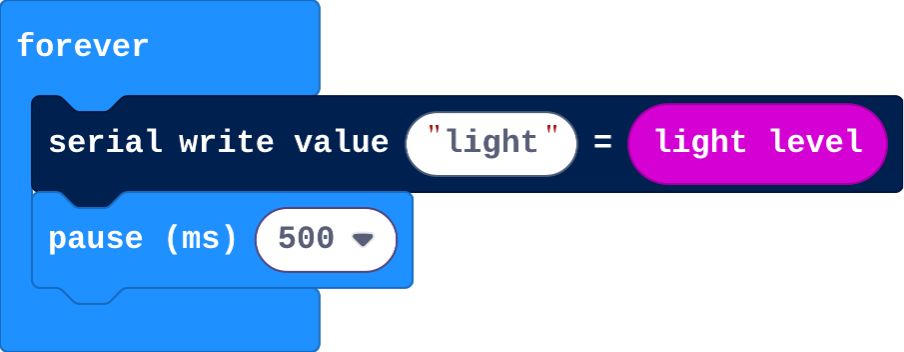
![h:176](https://studio.learningwaypoints.com/tutorials/_pictures/makecode/code/b4960c33e4a3.png?v=fb3a9231a6407ea8)

**This program runs on a micro:bit plugged into a computer. What arrives at the computer every half second?**

- A picture of the LEDs
- Just the number 128
- A line of text, such as light:128
- A graph

<!-- Speaker note: What happens: A line of text: the name light, a colon, and the reading. The computer draws the graph from the lines; the micro:bit only sends text. Take two or three predictions before anyone runs it. -->

<!-- Speaker note: Teacher: most say a graph. Ask: who draws the graph, the micro:bit or the computer? -->

---

<span style="background:#dcfce7; color:#1a1a1a; border:1.5px solid #22c55e; padding:6px 18px; border-radius:8px; font-size:1em; font-weight:500;">✅ Check</span>

## What happened?

* A line of text: the name light, a colon, and the reading. The computer draws the graph from the lines; the micro:bit only sends text.

<!-- Speaker note: Reveal after running. Ask who predicted it, and what made them think so. -->

---

<span style="background:#fef3c7; color:#1a1a1a; border:1.5px solid #f59e0b; padding:6px 18px; border-radius:8px; font-size:1em; font-weight:500;">✍️ Activity</span>

## Run it

Open the lesson at this step and try it together.

[studio.learningwaypoints.com/tutorials/code/microbit-computer/send-data/?full=step-2#step-2](https://studio.learningwaypoints.com/tutorials/code/microbit-computer/send-data/?full=step-2#step-2)

<!-- Speaker note: Run it in the simulator. Under the micro:bit, click **Show data** (it appears once a program sends values) to see the readings as numbers and as a graph. Drag the simulator's **light level** up and down. Students should be able to say: I changed the light level in the simulator and watched the values change under Show data. -->

<!-- Speaker note: Teacher: Show data appears under the simulator once values arrive. -->

---

<span style="background:#fef3c7; color:#1a1a1a; border:1.5px solid #f59e0b; padding:6px 18px; border-radius:8px; font-size:1em; font-weight:500;">✍️ Activity</span>

## Run it

{{embed: https://studio.learningwaypoints.com/tutorials/_playground-board/index.html?id=deck%2Fcode%2Fmicrobit-computer%2Fsend-data%2Fstep-3&code=widget%3A+serial%0Awindow%3A+20%0A&fresh=1}}

[Open this step in the tutorial](https://studio.learningwaypoints.com/tutorials/code/microbit-computer/send-data/?full=step-3#step-3)

<!-- Speaker note: Click **Download** in the editor and copy the program to your micro:bit. Leave it plugged in, then click **Connect a micro:bit** below and choose it. Cover the micro:bit with your hand, then shine a torch on it. -->

<style scoped>pre, marp-pre { font-size: 0.5em; line-height: 1.25; } section { font-size: 25px; }</style>

---

<span style="background:#dbeafe; color:#1a1a1a; border:1.5px solid #3b82f6; padding:6px 18px; border-radius:8px; font-size:1em; font-weight:500;">💬 Discussion</span>

## Investigate

![h:176](https://studio.learningwaypoints.com/tutorials/_pictures/makecode/code/b4960c33e4a3.png?v=fb3a9231a6407ea8)

<!-- Speaker note: What this step is for: Each reading is a named line of text sent again and again; the name tells values apart and the pause sets how often a reading is sent. -->

<!-- Speaker note: Teacher: Ben's logger is the on start versus forever slip from Foundations. -->

---

<span style="background:#dcfce7; color:#1a1a1a; border:1.5px solid #22c55e; padding:6px 18px; border-radius:8px; font-size:1em; font-weight:500;">✅ Check</span>

## Names

**Why does each line start with a name (light:)?**

- To make the number bigger
- So the micro:bit remembers it
- The cable needs a name to work
- So the computer can tell different values apart when there are several

* Answer: So the computer can tell different values apart when there are several

<!-- Speaker note: With light:128 and temperature:21 arriving on the same cable, the name says which is which. The graph draws one line per name. -->

<style scoped>pre, marp-pre { font-size: 0.5em; line-height: 1.25; } section { font-size: 27px; }</style>

---

<span style="background:#dcfce7; color:#1a1a1a; border:1.5px solid #22c55e; padding:6px 18px; border-radius:8px; font-size:1em; font-weight:500;">✅ Check</span>

## No pause

**You delete the pause. What happens?**

- One reading is sent, then it stops
- Nothing is sent
- The readings get more accurate
- Readings pour out as fast as the micro:bit can send them, far more than you need

* Answer: Readings pour out as fast as the micro:bit can send them, far more than you need

<!-- Speaker note: Forever repeats as fast as it can. The pause sets how many readings a second you get: 500 ms is two a second. -->

<style scoped>pre, marp-pre { font-size: 0.5em; line-height: 1.25; } section { font-size: 27px; }</style>

---

<span style="background:#dcfce7; color:#1a1a1a; border:1.5px solid #22c55e; padding:6px 18px; border-radius:8px; font-size:1em; font-weight:500;">✅ Check</span>

## Ben's logger

Ben's program:

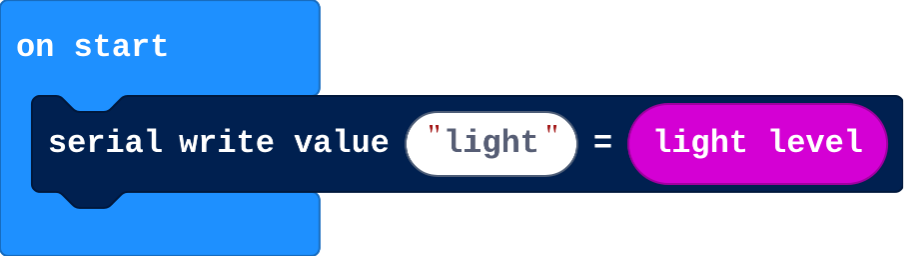
![h:128](https://studio.learningwaypoints.com/tutorials/_pictures/makecode/code/ca105b06a77d.png?v=9c7f73c9df351e18)

**Ben's program sends one reading when the micro:bit starts, then nothing. Why?**

- Light level only works once
- The board can only read one line
- The cable is broken
- The block is in on start, not in forever, so it runs only once

* Answer: The block is in on start, not in forever, so it runs only once

<!-- Speaker note: A logger has to read and send again and again: the send goes in forever, with a pause. -->

<style scoped>pre, marp-pre { font-size: 0.5em; line-height: 1.25; } section { font-size: 21px; }</style>

---

<span style="background:#fef3c7; color:#1a1a1a; border:1.5px solid #f59e0b; padding:6px 18px; border-radius:8px; font-size:1em; font-weight:500;">✍️ Activity</span>

## Modify


- **Two values:** Send the **temperature** too, with its own name. In Show data (or on the board), each name gets its own line.
- **Faster:** Make it send **ten readings a second**.

[Open this step](https://studio.learningwaypoints.com/tutorials/code/microbit-computer/send-data/?full=step-5#step-5)

<!-- Speaker note: What this step is for: A second named value appears as its own line on the graph; changing the pause changes how often readings arrive. Hints, in order: Add a second serial write value inside forever, named temperature, with temperature (°C) from Input. / Change the pause so it sends ten readings a second. For students who need more support: Give the Make program with x done; students add y and the button. For early finishers: Send the sound level too, and find out which is noisier: the classroom or the corridor. The hard part, on purpose: The text format links the micro:bit and the board. When nothing shows, ask whether the program is running and the write block is inside forever. When students get stuck: Show data never appears. Ask: Is the program running? Is serial write value inside forever? Fix: Restart the simulator; put the send inside forever. / Connect a micro:bit lists nothing. Ask: Are you in Chrome or Edge, with a data cable? Fix: Use Chrome or Edge; try another cable (some only charge). / Only one reading arrives. Ask: Which block is the send in? Fix: Move it into forever with a pause. -->

---

<span style="background:#fef3c7; color:#1a1a1a; border:1.5px solid #f59e0b; padding:6px 18px; border-radius:8px; font-size:1em; font-weight:500;">✍️ Activity</span>

## Make

Make a **tilt logger**: send the micro:bit's **x** and **y** acceleration five times a second, and send the line **mark** when **A** is pressed, so you can mark a moment on the record. Tilt it in the simulator and watch Show data.

[Open this step](https://studio.learningwaypoints.com/tutorials/code/microbit-computer/send-data/?full=step-6#step-6)

<!-- Speaker note: Hints, in order: Acceleration (mg) is in Input; choose x, then y. / Two serial write value blocks in forever: x and y. On button A pressed: serial write line mark. -->

---

<span style="background:#dcfce7; color:#1a1a1a; border:1.5px solid #22c55e; padding:6px 18px; border-radius:8px; font-size:1em; font-weight:500;">✅ Check</span>

## Exit ticket

**What does the computer receive when the micro:bit runs serial write value light, light level?**

* A line of text: the name light, a colon and the reading, such as light:128.

<!-- Speaker note: Students answer on paper or a mini whiteboard before the reveal. Anyone who cannot answer needs the main idea again next lesson. Where this leads: Next: the computer sends commands to the micro:bit. Real world: data loggers in science labs, weather stations and fitness trackers. -->