---
marp: true
theme: default
html: true
---

# A radio bridge

micro:bit and the computer · A radio bridge

<!-- Speaker note: Students build a radio bridge, so a micro:bit across the room sends readings to the computer and receives commands from it. About 50 minutes (Predict and Run 8 min · Across the room 8 min (typical) · Investigate 8 min · Modify 12 min · Make 12 min · Test 3 min (typical)). -->

---

## Today

**We are learning to** a micro:bit on the cable relays messages by radio, so the micro:bit doing the work can be anywhere in the room. The bridge passes radio to serial one way and serial to radio the other.

- I can pass radio messages on to the computer, and lines from the computer on by radio.
- I can explain why both micro:bits need the same radio group.
- I can explain why a micro:bit never hears its own radio messages.

<!-- Speaker note: Before class: **The idea:** a **bridge** relays. On the micro:bit plugged into the computer, **on radio received value → serial write value** passes radio readings to the computer, and **on serial data received → radio send string** passes lines from the computer on by radio. The micro:bit across the room only uses radio. **One program on both micro:bits:** each part only does something on the micro:bit where it matters (the bridge also sends its own temperature by radio, but no other micro:bit passes it on, and a micro:bit never hears its own messages). This keeps the lesson to one program; in the simulator, a radio program runs on two micro:bits. **Hardware:** two micro:bits per pair (one with a battery pack), a data cable and Chrome or Edge. The board steps are typical, so classes without hardware use the simulator's Show data. **Give every pair its own radio group** before anyone downloads, or bridges pick up other pairs' readings. Teacher: Across the room: warming the far micro:bit in your hands shows the graph rising. -->

---

## Why it matters

> Smart-home sensors, farm soil probes and wildlife cameras send their readings by radio to one hub, and the hub passes them on to a computer. The hub is a bridge.

<!-- Speaker note: A micro:bit on a cable can't go far. In this lesson a second micro:bit, anywhere in the room, sends its readings by **radio** to the micro:bit on the cable, which passes them on to the computer. That micro:bit is a **bridge**. The same program goes on both micro:bits: each part only does something on the micro:bit where it makes sense. In the simulator you will see two micro:bits running it. Readings travel with **radio send value** (in **Radio**): a short **name**, such as `temp`, and a number together. **on radio received value** gives the bridge both, as `name` and `value`. A name can be **8 characters at most**: a longer one, such as `temperature`, is cut short on the way. -->

---

<span style="background:#dbeafe; color:#1a1a1a; border:1.5px solid #3b82f6; padding:6px 18px; border-radius:8px; font-size:1em; font-weight:500;">💬 Discussion</span>

## Predict

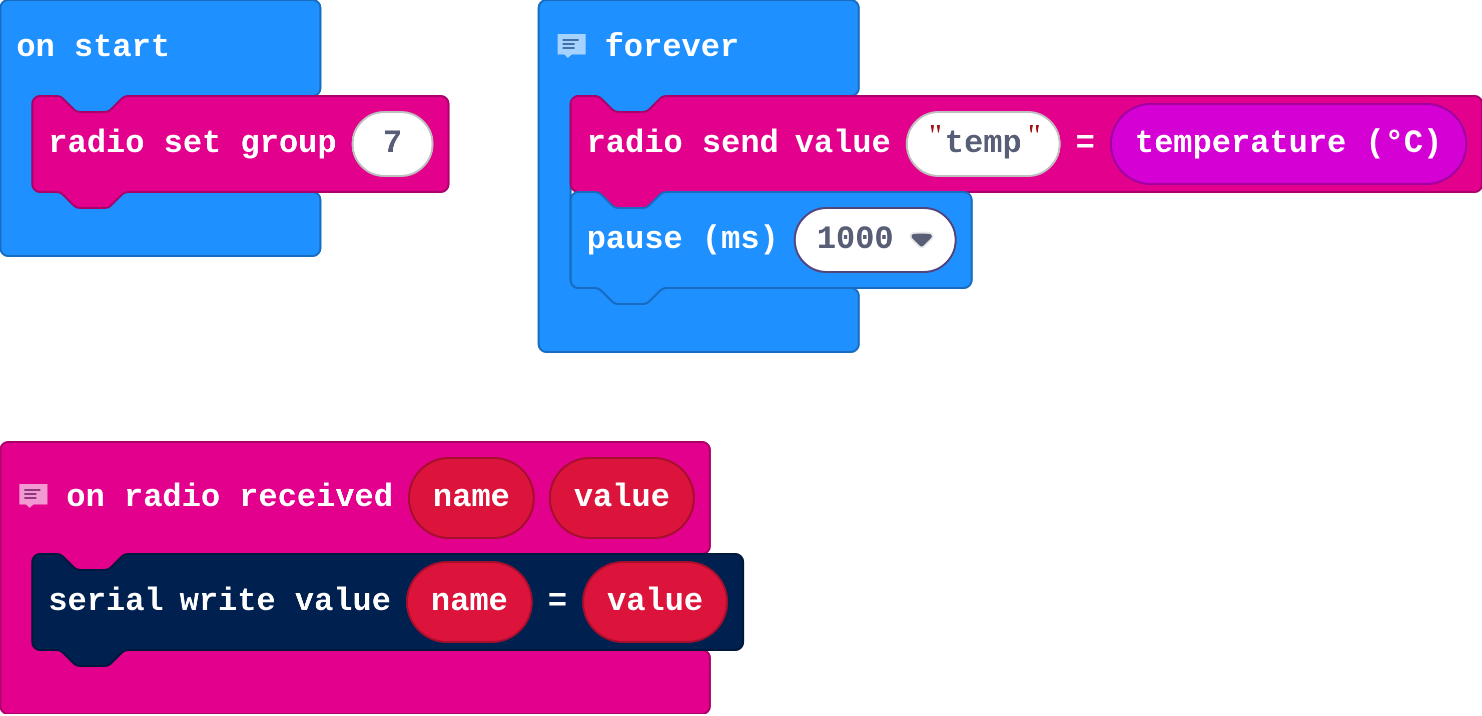
![h:357](https://studio.learningwaypoints.com/tutorials/_pictures/makecode/code/e89a860d08c5.png?v=6214aba62b5f0b76)

**The micro:bit across the room is at 24 °C. What does the computer receive from the bridge?**

- The radio signal itself
- A line: temp:24
- Nothing: radio can't reach a computer
- A line: 24

<!-- Speaker note: What happens: temp:24. The far micro:bit sends the name and value by radio; the bridge's on radio received value passes them on with serial write value. Take two or three predictions before anyone runs it. -->

<!-- Speaker note: Teacher: some say a bare number. Ask: which block sends the name? -->

---

<span style="background:#dcfce7; color:#1a1a1a; border:1.5px solid #22c55e; padding:6px 18px; border-radius:8px; font-size:1em; font-weight:500;">✅ Check</span>

## What happened?

* temp:24. The far micro:bit sends the name and value by radio; the bridge's on radio received value passes them on with serial write value.

<!-- Speaker note: Reveal after running. Ask who predicted it, and what made them think so. -->

---

<span style="background:#fef3c7; color:#1a1a1a; border:1.5px solid #f59e0b; padding:6px 18px; border-radius:8px; font-size:1em; font-weight:500;">✍️ Activity</span>

## Run it

Open the lesson at this step and try it together.

[studio.learningwaypoints.com/tutorials/code/microbit-computer/radio-bridge/?full=step-2#step-2](https://studio.learningwaypoints.com/tutorials/code/microbit-computer/radio-bridge/?full=step-2#step-2)

<!-- Speaker note: The simulator runs the program on two micro:bits. Change the **temperature** on one of them, then open **Show data** to see what the other passes on. Students should be able to say: I changed the temperature on one simulated micro:bit and saw the values arrive under Show data. -->

---

<span style="background:#fef3c7; color:#1a1a1a; border:1.5px solid #f59e0b; padding:6px 18px; border-radius:8px; font-size:1em; font-weight:500;">✍️ Activity</span>

## Run it

{{embed: https://studio.learningwaypoints.com/tutorials/_playground-board/index.html?id=deck%2Fcode%2Fmicrobit-computer%2Fradio-bridge%2Fstep-3&code=widget%3A+serial%0Aplot%3A+temp%0Awindow%3A+30%0A&fresh=1}}

[Open this step in the tutorial](https://studio.learningwaypoints.com/tutorials/code/microbit-computer/radio-bridge/?full=step-3#step-3)

<!-- Speaker note: Download the program to **two** micro:bits. Plug one in and connect it here; put the other on a battery pack across the room (or hold it in your hands to warm it up). -->

<style scoped>pre, marp-pre { font-size: 0.5em; line-height: 1.25; } section { font-size: 25px; }</style>

---

<span style="background:#dbeafe; color:#1a1a1a; border:1.5px solid #3b82f6; padding:6px 18px; border-radius:8px; font-size:1em; font-weight:500;">💬 Discussion</span>

## Investigate

![h:357](https://studio.learningwaypoints.com/tutorials/_pictures/makecode/code/e89a860d08c5.png?v=6214aba62b5f0b76)

<!-- Speaker note: What this step is for: A bridge relays: radio in becomes serial out, and (with one more block) serial in becomes radio out. Both micro:bits must share a radio group. -->

<!-- Speaker note: Teacher: the match is the whole idea; Ben's group is the Foundations slip again. -->

---

<span style="background:#dcfce7; color:#1a1a1a; border:1.5px solid #22c55e; padding:6px 18px; border-radius:8px; font-size:1em; font-weight:500;">✅ Check</span>

## Two directions

**Match each block with the job it does in the bridge.**

| | |
|---|---|
| `on radio received value → serial write value` | A. radio to the computer |
| `on serial data received → radio send string` | B. only micro:bits in the same group hear each other |
| `radio set group` | C. the computer to radio |

* Answer: on radio received value → serial write value → A. radio to the computer; on serial data received → radio send string → C. the computer to radio; radio set group → B. only micro:bits in the same group hear each other

<!-- Speaker note:  -->

<style scoped>pre, marp-pre { font-size: 0.5em; line-height: 1.25; } section { font-size: 22px; }</style>

---

<span style="background:#dcfce7; color:#1a1a1a; border:1.5px solid #22c55e; padding:6px 18px; border-radius:8px; font-size:1em; font-weight:500;">✅ Check</span>

## Ben's bridge

![h:136](https://studio.learningwaypoints.com/tutorials/_pictures/makecode/code/32dcc69d6fcf.png?v=604d1aa0be69aa4d)

**Ben's far micro:bit is in radio group 7 and his bridge is in group 8. What does the board show?**

- The values arrive slowly
- Nothing arrives
- The values arrive twice
- Only the first value arrives

* Answer: Nothing arrives

<!-- Speaker note: Radio messages reach only micro:bits in the same group. Ben's bridge never hears the readings. -->

<style scoped>pre, marp-pre { font-size: 0.5em; line-height: 1.25; } section { font-size: 27px; }</style>

---

<span style="background:#dcfce7; color:#1a1a1a; border:1.5px solid #22c55e; padding:6px 18px; border-radius:8px; font-size:1em; font-weight:500;">✅ Check</span>

## Its own messages

**Both micro:bits run the same program, so the bridge also sends its own temperature by radio. Why doesn't the bridge's own temperature appear on the board?**

- The board ignores the bridge
- Two values can't share a name
- The bridge has no temperature sensor
- A micro:bit never hears its own radio messages

* Answer: A micro:bit never hears its own radio messages

<!-- Speaker note: Radio goes to every other micro:bit in the group, never back to the sender. So only the far micro:bit's readings arrive. (If you use three micro:bits, give them different names.) -->

<style scoped>pre, marp-pre { font-size: 0.5em; line-height: 1.25; } section { font-size: 27px; }</style>

---

<span style="background:#fef3c7; color:#1a1a1a; border:1.5px solid #f59e0b; padding:6px 18px; border-radius:8px; font-size:1em; font-weight:500;">✍️ Activity</span>

## Modify


- **Light too:** Send the **light level** as well. Did you have to change the bridge?
- **Beep:** Add the other direction: the bridge passes each line from the computer on by radio, and the far micro:bit **beeps** when it receives **beep**.

[Open this step](https://studio.learningwaypoints.com/tutorials/code/microbit-computer/radio-bridge/?full=step-5#step-5)

<!-- Speaker note: What this step is for: Adding a value on the far side needs no change to the bridge; adding the computer-to-radio direction needs one more block. Hints, in order: In forever, add radio send value light, light level. / On serial data received: radio send string, read line. That is the computer-to-radio direction. / On radio received string: if receivedString = beep, play a tone (Music). For students who need more support: Give the bridge part complete; students write only the far micro:bit's part. For early finishers: Use three micro:bits: two sensors in different rooms, each sending its own name (temp1, temp2), and graph both. The hard part, on purpose: Three parts in a chain: far micro:bit, bridge, computer. When nothing arrives, ask them to check each link in turn, starting with the radio group. When students get stuck: Nothing arrives on the board. Ask: Are both micro:bits in the same radio group? Is the far one switched on? Fix: Use the same group; check the battery pack. / Readings from another pair appear. Ask: Which radio group are you using? Fix: Choose your own group number and download to both again. / Commands from the board do nothing on the far micro:bit. Ask: Does the bridge pass lines from the computer on by radio? Fix: Add on serial data received → radio send string (read line). -->

<!-- Speaker note: Teacher: point out that sending light needed no change to the bridge. -->

---

<span style="background:#fef3c7; color:#1a1a1a; border:1.5px solid #f59e0b; padding:6px 18px; border-radius:8px; font-size:1em; font-weight:500;">✍️ Activity</span>

## Make

Make a **room monitor**: the far micro:bit reports **temperature** and **light** every second, shows an alarm (a cross) when the computer sends **alarm**, clears it on **clear**, and reports **alarm 1** or **alarm 0** so the computer knows it worked.

[Open this step](https://studio.learningwaypoints.com/tutorials/code/microbit-computer/radio-bridge/?full=step-6#step-6)

<!-- Speaker note: Hints, in order: The bridge part: serial to radio, and radio to serial (from the last step). / The far part: send temp and light every second; on radio received string alarm show a cross and send alarm 1; clear clears the screen and sends alarm 0. -->

---

## Test the monitor

Download your monitor to two micro:bits, connect the bridge here, and try **Alarm** and **Clear**.

---

<span style="background:#dcfce7; color:#1a1a1a; border:1.5px solid #22c55e; padding:6px 18px; border-radius:8px; font-size:1em; font-weight:500;">✅ Check</span>

## Exit ticket

**What does a bridge micro:bit do?**

* It passes radio messages on to the computer over the cable, and lines from the computer on by radio.

<!-- Speaker note: Students answer on paper or a mini whiteboard before the reveal. Anyone who cannot answer needs the main idea again next lesson. Where this leads: Next: train a model and let its labels travel the same path. Real world: smart-home hubs, farm sensor networks, wildlife monitoring. -->